Enchantment Learning & Living Blog

Welcome to Enchantment Learning & Living, the inspirational space where I write about the simple pleasures, radical self-care, and everyday magic that make life delicious.

Homemade Mineral Foundation

I don’t wear a lot of makeup and lately, I’ve been going more and more natural.  When I do wear makeup, I want it to be as organic as possible.  The only issue with that, of course, is that organic makeup can be super expensive and still full of yucky ingredients. It’s better than the drug-store makeup but when I learned that many brands sneak in various preservatives and no-no additives to products that are supposed to be cleaner than your average makeup. 

That got me thinking: why am a paying a small fortune for “organic” makeup if it isn’t as pure as I thought?  I’ve also become more aware of the waste involved in buying tiny one-ounce products and then having to throw away the used compact or jar once I’ve used up the foundation.  I am trying to buy, use, and waste less this year, after all.  

Sure, I could go makeup free, but sometimes I need a little coverage.  It’s akin to putting on armor for a workday or adding a touch of glamour when I want to go out and feel pretty.  Then it hit me: I’ve gone full-on hippy homemaker in the past and made my own mascara and bronzer, so why not make my own foundation?  It would be cheaper, less wasteful, and I would always be sure I got the right tint.

Let me tell you right now that this journey has been a process.  I started with recipes I found online that said you could make your own foundation using only arrowroot powder and kitchen spices.  Sold!  How much more natural could a woman get?  Alas, if it sounds too good to be true, then it probably is.  I tried various recipes, various amounts of cinnamon, nutmeg and arrowroot powder, and it still always came out looking like I had dusted spices on my face.  At least I smelled like freshly baked goods!

That’s when I turned to mineral makeup.  Technically, you can’t call anything like minerals that are pulled from the earth organic, because we can’t control the elements. It’s kind of like the same way you can’t call fish organic, only line-caught, because, as they swim around in the ocean, they can come into contact with all sorts of matter.  Still, it’s as natural as you can get—like the bronzer I made. 

Some people worry about using titanium dioxide in this mix, but I figure if it’s in the store-bought mineral products I buy and wear, I should be fine.  It’s the unpronounceable things on the list of ingredients that worry me. From what I found on my research, the only danger in titanium dioxide is in using the nanoparticles version where the particles are so small you can absorb more than is good for you, similar to how you should always use non-nano zinc oxide for your homemade sunscreen.  

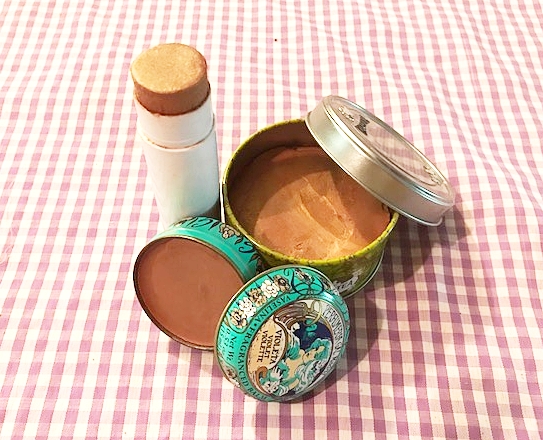
Okay, enough of the technical talk!  Let’s get to the recipe.  I love it!  It took me all of ten minutes to make and looks and feels wonderful.  There’s an initial investment in buying bulk supplies (I spent roughly $60 on ingredients).  But once you have them, you’ll never have to get more for a VERY long time (and FYI, the ingredients never go bad).  I adapted my recipe from Natural Organic Products & Recipes and The Humble Homemaker.

I cut my portions in half because I like working in small batches until I know how something will work out.  Even with my half-batch, I used a few dollars worth of the ingredients and ended up with several ounces of makeup—at least ten times the amount of the small jars and compacts that you shell out $25-$40 for.  What?!  I know.  Totally worth the investment.  At this rate, my half batch will cover me for a few years and then I have plenty of raw ingredients for when I need more.  Dare I say that my $60 investment will last a lifetime?  Maybe not that long, but it sure beats shelling out half that every six months for an ounce of makeup in a container I ultimately have to throw away.  

The last thing I’ll say about this is that, of course, not all skin tones are the same.  My recipe is for olive skin tones, but this fabulous website has the list of ingredients and measurements you’ll need for other skin tones.  Play with it to see what works for you.  I ended up leaving out the clay in their instructions as well as a few other ingredients from The Humble Homemaker because they didn’t feel necessary to me.  Do make sure to purchase a coffee grinder that you use ONLY for makeup and similar DIY products and be careful not to breathe in the ingredients while you mix them (I like to tie a damp cloth around my nose and mouth to be safe).  

Ingredients:

5 tsp titanium dioxide

1/2 tbsp serecite mica

2 tsp zinc oxide

1/2 tsp magnesium stearate

3/4 tsp brown iron oxide

1/8 tsp deep red oxide

5 tsp yellow iron oxide

Mix ingredients in bowl reserved only for makeup and similar DIY projects.  Stir until combined.  Then, in small batches, blend in coffee grinder (again, making sure that this is one you use only for these types of projects).  As you finish each batch, pour into reusable container like a mason jar.  Shake jar to combine each batch you’ve run through the coffee grinder.  Store in a cool, dry place. 

To use, place a small amount in an old cosmetic container and, using your blusher, dust your face with desired amount.  If you don’t have a small container that you can reuse, simply keep in the foundation in the larger jar and be sure to shake the blusher before applying to remove any excess powder.  

Note: If foundation looks too dark, add more titanium dioxide in small amounts.  

Makes roughly 8 oz

IMG_3710.jpg


Enchantment Learning & Living is an inspirational blog celebrating life’s simple pleasures, everyday mysticism, and delectable recipes that are guaranteed to stir the kitchen witch in you. If you enjoyed what you just read and believe that true magic is in the everyday, subscribe to my newsletter below for regular doses of enchantment. Want even more inspiration? Follow me on InstagramFacebookPinterest, and Twitter. Here’s to a magical life!

Comment
Share

Homemade Shampoo & Facial Cleanser

It’s official, I’ve gone off the hippy-DIY deep-end.  Actually, it happened a long time ago when I started making my own shampoo and facial cleanser!   I know, every time you think I couldn’t possibly be any more tree-huggery, I confess that I’ve been doing something like making my own shower products for years.

I started for a multitude of reasons, the biggest being that I have thick crazy hair that doesn’t respond well to most conventional shampoo products and sensitive skin that gets easily irritated with the various chemicals used in most facial cleansers and soaps.  Even when the organic specialty products promised extra-hydration for dry locks or gentle formulas for sensitive skin, none of it worked.  I ended up spending a small fortune on organic products that did nothing for me but give me brittle hair and dry skin.

I’ve learned over the years that simpler truly is better.  Tired of expensive, useless products, I finally tried this very simple recipe from who knows where (it’s been long enough that I can’t actually remember how I got started on this, probably from a magazine or book):  Diluted castile soap with your choice of essential oils. 

What?! That’s it? Yup.

I tried it over five years ago and have never gone back.  Gone are the pile of shampoo bottles and jars of face soaps clogging my shower caddie and putting a dent in my wallet.  Instead, I have two repurposed honey-bear bottles—the large one for shampoo and the smaller for my facial cleanser. 

Since I’ve switched to using castile soap as the foundation for both my shampoo and face soap, my skin is happier and my hair more hydrated.  The trick is to make sure that you are, in fact, properly diluting castile soap.  One of the things that can make Dr. Bronner’s soap seem expensive is that it is highly concentrated, which means it should never be used without diluting it.  Once you do that, you understand that while it can seem pricey, a little goes a very long way! 

Another perk to this recipe is that is reduced the amount of packaging you buy then throw out—so say goodbye to the wasteful packaging of all those shampoo bottles!  Repurposing old bottles and purchasing castile soap in bulk from your local co-op, using your own container to fill up, lets you go that extra mile in waste reduction.  When all is said and done, you end up spending mere pennies on shampoo and face wash.  

The only real difference between the shampoo and face wash is the amount of essential oils you put in.  Because the skin on your face can be very sensitive, only use 5-10 drops in your mixture.  That’s enough to get the healing benefits of the oils without an irritation.  For your shampoo, you can use more.  When in doubt, use less essential oils than you think you need.  Like the soap, a little essential oil goes a long way!

Last but not least, I have a few optional ingredients you can throw in for an added boost of nourshiment and cleansing, but they aren't necessary.  Experiment and see what works for you.  That's half the fun of DIY-ing your beauty routine, after all! 

Basic Ingredients:

Castile soap

Water

Optional Ingredients: 

Essential oils of choice

Honey

Activated Charcoal (for facial cleanser only)

Olive Oil (for shampoo only)

For Shampoo: 

Combine 1/4 cup castile soap with 1 cup water.  Add 15-20 drops essential oil of choice.  I like to use rosemary because it makes your hair shinier, peppermint, or cinnamon to boost growth (it also smells really nice!).  If that said, if you have sensitivities to scents, you can always omit the oils.

Other things you can add to your shampoo are honey (approximately 1/4 cup) or olive oil (1/4 cup) to hydrate your locks and help them retain moisture.  (If your hair is very dry, consider using my Goddess Hair Mask once a week.)

Combine ingredients in your repurposed container and shake until combined.  To use, pour desired amount on wet hair, lather, rinse, and repeat.

Makes approximately 1-1 1/2 cups.

For Facial Cleanser:

Combine 1/4 castile soap with 1 cup water.  Add 5-10 drops essential oil of choice.  I love clove oil because it is anti-bacterial.  You can add a teaspoon of honey to lock in moisture and provide additional anti-bacterial help.  Or you can mix in a teaspoon of activated charcoal to clean pores and purify skin. 

Combine ingredients in your repurposed container and shake until combined.  To use, pour a dime sized amount into your hand and gently massage into wet face.  Rinse.  

Makes approximately 1 cup.

Enjoy!

IMG_3706.jpg

Enchantment Learning & Living is an inspirational blog celebrating life’s simple pleasures, everyday mysticism, and delectable recipes that are guaranteed to stir the kitchen witch in you. If you enjoyed what you just read and believe that true magic is in the everyday, subscribe to my newsletter below for regular doses of enchantment. Want even more inspiration? Follow me on InstagramFacebookPinterest, and Twitter. Here’s to a magical life!

Comment
Share

Vegan Bacon Recipe

I know, I know. Vegan bacon is a total oxymoron! Strange name aside, I can promise you that it tastes delicious. I began my quest for healthier breakfast sides after I realized this past winter that I was eating more and more bacon come the weekend which was bad for my waistline and health. Then I realized what I really loved about bacon is that it made me feel fancy. Breakfast could be a decadent diner plate with scrambled eggs, buttery toast, and yes, bacon. 

So then the quest began. How do I make a healthier weekend breakfast side? I was inspired by these recipes from Minimalist Baker and Veganosity, but as always, modified them so that I didn't have to buy any special ingredients--those things that usually end up getting used once and then thrown out (yet another attempt for me to waste less is to buy only condiments and ingredients I know I'll use). An added bonus to this recipe? Eating less meat is better for the environment all around, not just for your health.

Typically I avoid most things called vegan because they end up being highly processed. I would also rather eat something that tastes like what it is, like tofu for example, rather than beef flavored tofu. I mean, how many gross additives and artificial ingredients go into making fake meat? Yuck! All that artificial stuff is hardly good for the environment either. There are, of course, a few exceptions, like this bacon and my vegan fudge, both of which use only natural ingredients and only foodstuff that I already have in my pantry: maple syrup, amino acids, garlic, and chipotle chile powder. Together these ingredients make for a sweet smokey flavor akin to bacon. If you have never used amino acids before, give them a try! I started using Braggs liquid amino acids as a healthier substitute for soy sauce and haven’t looked back since. 

This recipe works well with eggplant (pictured here) as well as mushrooms. I have even seen people use carrots and turnips, though I have yet to try those options. You can slice these longways or, as I prefer, in circular discs. The big thing you need to make sure you do is to use a mandolin or other sharp cutting tool to produce thin, even slices so your pieces cook evenly. If they are too thick, they won’t have that crispy bacon feel.  

All in all, this vegan bacon is the perfect blend of crispy, salty, and smokey--and it goes great with scrambled eggs and toast! 

ingredients: 

1 eggplant, thinly sliced  

1/4 cup Braggs liquid amino acids

1/4 cup maple syrup

1/2 tablespoon smoke chipotle powder

1-2 cloves garlic, minced

Combine all ingredients, except the eggplant, in a shallow pan or bowl. Then place eggplant slices in mixture and let marinate at least 30 minutes. I usually let them marinate overnight for best flavor. To cook, squeeze the moisture from eggplant piece so they are as dry as possible. This will ensure that they get crispy while cooking, not soggy. Heat oil in frying pan on medium. Once the pan is hot, place first round of eggplant on pan’s surface and cook without flipping for 1-2 minutes, watching carefully so that pieces crisp up, not burn. Flip pieces and repeat on the second side until browned. These are best eaten hot with scrambled eggs and toast. Serves 4-6. Enjoy!

Eggplant Dish

Enchantment Learning & Living is an inspirational blog celebrating life’s simple pleasures, everyday mysticism, and delectable recipes that are guaranteed to stir the kitchen witch in you. If you enjoyed what you just read and believe that true magic is in the everyday, subscribe to my newsletter below for regular doses of enchantment. Want even more inspiration? Follow me on Instagram, Facebook, Pinterest, and Twitter. Here’s to a magical life!

Comment
Share

Cabbage Steaks Recipe

One of the ways we can reduce our carbon footprint is to simply eat less meat (and when we do eat it, to make sure it is grassfed, organic, and local). I don’t eat a whole lot of meat to begin with which means I’m always on the lookout for a delicious veggie-based meal, especially when it comes to dinner.  So when I came across this recipe for cabbage steaks, I was excited to try them. Now, it should come as no surprise that grilling cabbage will not make it taste like steak. That said, I love this dish. It’s earthy, tasty, and super healthy for you and the planet. 

I tweaked the original recipes to include a splash of red chile to the mustard sauce and swapped the rosemary for tarragon to the marinade. You can make this either by roasting whole slices of cabbage or sear them individually in a hot pan. I like to pare these steaks with cannelloni beans or a simple salad. The recipe is easy enough to make and tasty enough to feel like a decadent dinner. Yum!

Ingredients:

For steaks:

whole red cabbage

olive oil 

1 tbs fresh tarragon, chopped

2 cloves garlic, minced

salt to taste

For sauce:

1/2 cup olive oil

1/2 cup apple cider vinegar

1 tsp red chile powder

1 tsp pepper

2 tbs mustard

1 small shallot, minced

salt to taste

Preheat oven to 425 degrees. Cut cabbage into one-inch thick slices. You can cut the tip of the stem off, but do not completely core it or the steak will be unable hold together. Lay cabbage steaks flat on an oven pan, making sure to rub top side with olive oil, tarragon, garlic, and salt, then flip over and do the same to the second side. Place pan in oven and roast for twenty minutes. Alternatively, slice desired amount of cabbage, rub in olive oil, tarragon, and garlic, then let sit for 15 minutes. Heat frying pan medium hot. Add oil and cabbage steak slice. Let sear for 2 minutes, flip, and sear another two minutes. 

For the sauce, let minced shallots marinate in vinegar for 15 minutes in jar, then add all other ingredients and shake. Serve steaks immediately, with a simple salad or a side of cannelloni beans sauteed in ghee and garnished with shredded kale, or (pictured here) with some parmesan-crusted snowpeas.

IMG_2095.jpg

Enchantment Learning & Living is an inspirational blog celebrating life’s simple pleasures, everyday mysticism, and delectable recipes that are guaranteed to stir the kitchen witch in you. If you enjoyed what you just read and believe that true magic is in the everyday, subscribe to my newsletter below for regular doses of enchantment. Want even more inspiration? Follow me on Instagram, Facebook, Pinterest, and Twitter. Here’s to a magical life!

Comment
Share

Mushroom Pate Recipe

I’m a sucker for a good appetizer. Come Saturday, all I want is a beautiful cocktail and a luxurious nibble for happy hour. What can I say, it makes me feel fancy!

One of my favorite go-to recipes, especially in the winter, is this mushroom pate. It’s rich, decadent and…healthy. Real talk: sometimes this *is* my dinner come Saturday night. Paired with some delicately bitter endive and a few slices of crostini, it’s a light meal that still makes you feel ritzy, even if you are eating this dish in your jammies (winky face). 

I especially love this pate because it is so versatile. To make it vegan, omit the milk. The dairy makes it taste a little creamier, but the dish is equally delicious without it. You can also swap out the milk for a tablespoon of goat cheese or even nutritional yeast. See what I mean? Versatile! Likewise, you can use any kind of mushrooms, from simple button or crimini to more exotic portobello, oyster, or chanterelle mushrooms. The type of mushrooms you choose of course affects the flavor. I’ve made this dish with all mushroom types and found them all just plain tasty.

Another perk of this recipe is that you can make as much or as little as you want. Below, I’ve given you the measurements for about one pound of mushrooms, but you can make more or less, depending on your needs.

Ingredients:

1 lb mushrooms, diced 

2 tbs fresh sage, chopped

1 clove garlic, minced

1 tsp pepper

1 tsp milk or cream (optional)

salt, to taste

olive oil

Heat oil on medium. Add garlic and sage, then cook on low for a minute or so. Add more oil and diced mushrooms, turning heat up to medium-low. Let mushroom sit, only turning every few minutes, for 15-20 minutes. Remove from heat. Let cool.

Once mushrooms have cooled, place them in blender and mix them together until mixture resembles a thick paste, but still has bits of bigger mushroom pieces in it. To make this a more authentic pate, you can chill it for an hour and then serve. It is, however, equally delicious warm. Plate with crostini, radicchio, endive, or other crudite. Top with chives or more sage. Serves 4.

Enjoy!

IMG_9723.JPG

Enchantment Learning & Living is an inspirational blog celebrating life’s simple pleasures, everyday mysticism, and delectable recipes that are guaranteed to stir the kitchen witch in you. If you enjoyed what you just read and believe that true magic is in the everyday, subscribe to my newsletter below for regular doses of enchantment. Want even more inspiration? Follow me on Instagram, Facebook, Pinterest, and Twitter. Here’s to a magical life!

Comment
Share

Goddess Hair Mask

I have wild hair.  Like seriously wild, unruly hair that doesn't know what to do with itself.  But I kinda like it that way.  But what I don't like is frizz.  Or brittle, chalky strands.  Alas, these conditions are all too easy to have when your hair is as thick as mine.

I've tried everything under the sun--from regular drug store products to fancy organic stuff--to hydrate my locks and make them silky.  Nothing has worked...until I learned how to make my own concoctions like my hydrating hair mask that uses honey to moisturize my luscious locks. 

In the past year, I've taken this original mask up a notch by including apple cider vinegar and coconut oil.  The results?  Goddess Hair.  Seriously.  During my year of radical Self-Care, I've recommitted to using this hair mask weekly because, after all, feeling lovely and like you're caring for your person in even the smallest ways is an integral part of wellness.  My hair is silky and wavy whenever I use this mask, the right kind of wild and loose.  Gone are the brittle strands and the puffy frizz ball that tries to pass as my regular mane.    

The honey helps your hair retain moisture while the coconut oil rehydrates it.  The apple cider vinegar does double duty cleansing your hair of buildup and balancing its pH.  I use equal parts of each ingredient, but you will want to play with the right ratio for you.  For instance, you might need way less coconut oil than I do if your hair isn't as prone to dryness.  I also like to add in various essential oils like rosemary or lavender to boost shine and nix any potential vinegary smell.  Quantity matters too--sometimes I use closer to 1/4 cup for each ingredient rather than 1/8 cup.  And of course, all ingredients are organic.  

Use it once a week, and I can guarantee you'll get Goddess Hair. Because who doesn't want to feel like a glamorous earth mama (or fella)?

Ingredients:

1/8 cup organic honey

1/8 cup melted coconut oil

1/8 cup apple cider vinegar  

20 drops essential oils of choice

Melt coconut oil and combine with room temperature vinegar and honey in a squirt bottle.  Add essential oils if desired.  Shake vigorously until combined.  To use, wet hair and then, using the bottle, squirt mixture until hair.  Massage it into scalp and comb into strands.  Put hair up in a bun and let sit for 20 minutes (now is a good time to give your body a good scrub down, indulge in a bubble bath, or read a book).  When done, rinse hair thoroughly and then shampoo as you normally would.  Do not use conditioner.  Let hair dry.  Use once a week for best results.  

Enchantment Learning & Living is an inspirational blog celebrating life’s simple pleasures, everyday mysticism, and delectable recipes that are guaranteed to stir the kitchen witch in you. If you enjoyed what you just read and believe that true magic is in the everyday, subscribe to my newsletter below for regular doses of enchantment. Want even more inspiration? Follow me on Instagram, Facebook, Pinterest, and Twitter. Here’s to a magical life!

Comment
Share

Homemade Bronzer

Over the years, I've gotten into making my own makeup (that's when you know you've gone full-on eco-conscious blogging hippy BTW).  The more I learned about the junk that goes into cosmetics--even the supposedly organic kind--the more I've tried to figure out ways to make my own for better quality control.  I started with my Thank Goodness It Ain't Maybelline Mascara and it's clear off-shoot that's ideal for hot summer days.  They made me a DIY makeup convert.  The recipes are quick and economical, costing me mere cents rather than the twenty or so dollars I would shell out for a good quality organic mascara!  Plus I know that my ingredients are all natural and safe to use.

I took it to the next level with this homemade bronzer.  It's great for sensitive skin like mine and for people who don't like a ton of heavy makeup on their face.  An added bonus for me is that I get to choose just the right color and saturation.  Seriously, who hasn't bought makeup that turned out to be the wrong shade for your complexion or much too heavy for your taste?  With my own blend, I take out the guess work. While it might cost a little up front to purchase your bulk ingredients, they go a long way and never spoil.  You end up spending only about a dollar for an ounce or two of bronzer.  Amazing!

I adapted my recipe from Wellness Mama, my go-to guru for everything DIY natural.  I even used Wellness Mama approved Gold Mica Powder and Bronze Mica Powder for my blend.  Technically these mineral powders can't be called organic because they come from the earth and might have other trace minerals or substances in them; it's similar to how you can never call fish organic, only wild caught.  That said, if using these natural mineral powders still bother you, I've seen some recipes successfully use cocoa powder and other spices for their bronzers.  I went ahead and used the mica powders because I wanted a little sparkle in mine (natch).

Feel free to play with the quantity and ratios of the powders here to get your desired look.  I just listed the blend that worked for me.  I like to store my bronzer in old lip balm tins and tubes for an added touch of beauty.  You can use this on your lips, cheeks, and even eyes.  This summer, it has become my go-to beauty product. 

So why do I include this in my year of Radical Self-Care?  Because sometimes we need to feel pretty.  Sparkly even.  I think this bronzer does the trick.

Special Tools:

Clean tin can

Old saucepan

Spatula

Ingredients:

2 TBS shea butter

1 TBS coconut oil

1/2 TBS beeswax

1/2 - 1 tsp of bronze mica powder

1/2 - 1 tsp of gold mica powder

Instructions:

1. Place the saucepan on low heat and fill halfway with water.  Then place the clean tin can in the center of the saucepan.  Put the beeswax in the tin can and let melt slowly. When beeswax is melted, remove from heat.

2.  When beeswax is melted, add the shea butter and coconut oil.  Don't be surprised if beeswax partially hardens.  It will melt again as the oil liquefies.  Let oils melt and blend with beeswax (it takes around five minutes).  Stir to mix fully.

3.  Remove from heat.  Stir in desired amounts of powder to oil and wax mixture.  (FYI: I like to keep a separate tin can that I use strictly for blushes and bronzers because the pigment will stick to the can.)  Stir until combined.

4.  Pour liquid into a container of choice, either a reused lip balm jar or chapstick tube.  Let sit until cooled and solidified (about an hour).  

Makes one large pot of bronzer or two to three smaller tubes.  To use, simply apply to lips and cheeks as desired.  Enjoy!

Enchantment Learning & Living is an inspirational blog celebrating life’s simple pleasures, everyday mysticism, and delectable recipes that are guaranteed to stir the kitchen witch in you. If you enjoyed what you just read and believe that true magic is in the everyday, subscribe to my newsletter below for regular doses of enchantment. Want even more inspiration? Follow me on Instagram, Facebook, Pinterest, and Twitter. Here’s to a magical life!

All-Purpose Seasoning

A few years ago, I started making my own all-purpose seasoning.  Why?  Because I got tired of buying small jars of the stuff for a few dollars a pop and because I learned that many of those spice blends contain additives, fillers, preservatives, and other yucky things I'd prefer to have in my body.  I'd also learned about the staleness and poor quality of the ingredients in many of theses blends by the time they reach store shelves.  Since part of committing to radical self-care is about becoming more aware of what consume, I decided to make my own healthier version of an all-purpose seasoning.  Now, I can never go back to the old stuff.

For starters, it is way less expensive!  Buying in bulk means you spend less on fresher goods, reduce waste by not paying for yet another spice jar, and you can tailor your blend to your own needs.  I buy my spices in bulk at my local herb store but you can also purchase bulk spices at your local natural grocery store or online at Rose Mountain Herbs.  

I use my blend for everything from popcorn to roasted veggies and beyond.  I've also gotten more than a few friends and family members addicted to it.  I use all organic ingredients and quality sea or Himalayan salt.  You can decide how much salt you want to include.  The recipe below suggests one cup of salt, but if you are on a reduced sodium diet, you can lower it to half a cup or omit it completely.  The cumin and paprika make the seasoning for me, adding unexpected notes of warmth and spice.  That said, if you prefer some spices over others, feel free to play with your own ratios or omit the flavors you don't enjoy.  What I offer here is simply my go-to seasoning recipe that enhances everything I cook. 

What's on the menu tonight?  I'm thinking Italian Grilled Veggies with a heavy sprinkling of this seasoning.  I might make a night of it and throw in a batch of watermelon coolers.  Take that heat wave.  

Ingredients:

1 cup sea salt 

1/2 cup pepper

1/4 cup cumin powder

1/4 cup onion powder

1/2 cup garlic powder

1/8 cup chile powder

1/8 cup paprika

Combine ingredients in bowl and stir well until combined.  Store in airtight container.  Makes a little less than three cups.  Enjoy!

Enchantment Learning & Living is an inspirational blog celebrating life’s simple pleasures, everyday mysticism, and delectable recipes that are guaranteed to stir the kitchen witch in you. If you enjoyed what you just read and believe that true magic is in the everyday, subscribe to my newsletter below for regular doses of enchantment. Want even more inspiration? Follow me on Instagram, Facebook, Pinterest, and Twitter. Here’s to a magical life!

Comment
Share

La Vie en Rose Cocktail

Ahhhh summer...the season when we are most likely to experience the world through rose-colored glasses and savor the sweeter things in life.  Lately, I've been working on cultivating a little more sweetness and a little more softness to my every day--which is, frankly, a lot harder than it sounds.  As much as I love simple pleasures and self-care, I am inherently a creature of discipline, focus, and routine which is great...up to a point.  

It makes me highly productive and able to relish the day-in-day-out of my teaching and writing life.  There's so much to be excited about, especially in my writing world (but I'm not telling about what yet, winky face).  And yet when summer comes, I am always reminded of the importance of cultivating my life beyond the page and the classroom, much as I love both.  Too much routine and you risk its dark side: stagnation.  

Summer keeps me playful, adventurous, and bold.  Summer is for saying yes to new experiences and keeping your heart open to adventures.  It is a season for relearning the value of being deliciously unproductive--or rather, recognizing that staying out all night dancing is just as important for your soul as your weekly workout routine is for your health.  Of course, summer is also for those sweep-you-off-your-feet novels that encourage you to find the romance in every situation.  

Laura Florand's Once Upon a Rose (which, you'll remember, I recommended back in April) is the perfect example of this kind of breezy, warm read that asks us--no, demands that we acknowledge the healing power of pleasure. It's not a perk in this book but a necessity for the well-being and creative life of the heroine, a burned-out indie musician, and the overly responsible hero, heir to a family business in Provance (cultivating--you guessed it!--roses for high-end perfume companies).  Their romance unfolds in a series of delicious scenes that saturate the senses and leave the lingering scent of roses in its wake.  In short, it's a story about the sweetness of finding your happily ever after--and the work it takes, especially for the more work-focused among us--to allow yourself to enjoy it.

Long after I finished the book, in fact, I thought of roses.  Big bold bouquets of them.  The gentle kiss of rose water splashed on the inside of my wrists.  The bushes lining neighborhood homes begging me to stop and take in their splendor.  And the desire to indulge in all things rosy...including cocktails.  

Thus my La Vie en Rose Cocktail was born.  It was inspired by three things: Florand's book, a bottle of rose liquor I stumbled upon, and Smart Bitches Trashy Books' Covers & Cocktails, in which readers concoct adult beverages based on various books they've read.  The results are always yummy and not unlike imbibing the liquid essence of the stories they are based on (how's that for everyday magic and kitchen conjuring?).  The drink is tart like a gimlet, soft like rose perfume, and sweet like a long summer night.  Gin adds a nice herbaceous bouquet, but if you prefer vodka, by all means, follow your heart.  And--who knows?--drinking this heady elixir just might make you bold enough to seek out your rose-colored happily ever after. 

Ingredients:

2 oz gin (or vodka)

3/4 oz fresh lime juice

1 oz rose liquor

ice

Combine all ingredients in a shaker and shake vigorously for thirty seconds.  Pour into martini glass.  Serves one, so find someone who makes you see the world through rose-colored glasses, double the recipe, and make a night of it.

Enchantment Learning & Living is an inspirational blog celebrating life’s simple pleasures, everyday mysticism, and delectable recipes that are guaranteed to stir the kitchen witch in you. If you enjoyed what you just read and believe that true magic is in the everyday, subscribe to my newsletter below for regular doses of enchantment. Want even more inspiration? Follow me on Instagram, Facebook, Pinterest, and Twitter. Here’s to a magical life!

Comment
Share

Sautéed Burdock Root

Part of my year of radical self-care is returning to the joys of cooking.  I've been making it a priority to cook on the weeknights (granted, my meals must be simple!) and to reignite my passion for trying new recipes and ingredients.  I sift through recipe books.  I check my Pinterest boards for new culinary delights.  Most importantly, I've gone back to hunting for different local, in-season ingredients to play around with, making each trip to the co-op a culinary adventure.  I find I look forward to whatever I might cook up during the week or weekend simply because I've gone beyond the pure need to fuel myself and returned to the hedonism of feeding the five senses--and my soul.

Time in the kitchen at the end of the day helps me to nourish myself.  Light a few beeswax candles.  Put on some jazz records.  Pour a glass of wine.  And cook.  It's a terribly civilized way to end the day.  After giving out energy for the past eight hours, I get to tuck in, recharge, and pull back from the more extroverted demands of my work.

Better still: I get to indulge in the delights of kitchen conjuring--taking raw ingredients, herbs, and spices, and turning them into healing, nourishing meals.  Which brings me to my latest love: burdock root.  I found this knotty unsung healer in an unassuming pile at my local store this winter and haven't been able to stop eating it since.  I'd used it for a long time in teas because of its terrific healing properties.  Like dandelion leaves and roots, burdock is known for its detoxifying properties.  It is antibacterial, anti-inflammatory, and cleanses the lymphatic system like nothing else.  Bonus: I found that's it's all kinds of tasty!  

I gathered a large handful for my kitchen experiment, searched high and low for recipes, and finally settled on a nice, simple sautée.  Burdock tastes like a cross between artichokes and turnips--similar to sunchokes.  I toss them in lemon juice to prevent them from oxidizing and turning a dusty brown color.  They're still edible oxidized...just not as yummy looking.  I prefer to use ghee for this recipe, as it lends a rich, nutty flavor to the root, but feel free to use what you have.  You'll notice I haven't given specific amounts here--you make as much or as little as you want.  Sautéed burdock is great as a side dish or as a light main attraction over a bed of lettuce (pictured above). 

Ingredients:

burdock root

lemon juice

ghee, coconut, or olive oil

sea salt (optional)

Wash burdock root thoroughly and let dry.  Using a peeler, shave off darker outer layer--save scraps for compost.  Slice root into thin medallions (diagonally works best to get larger pieces). Toss pieces in lemon juice.  This prevents browning and also gives the root a bright flavor. Heat ghee or oil on skilled.  Keep heat to medium.  Pour burdock root (with lemon juice) into pan and let simmer until cooked, about 15-20 minutes.  Serve immediately.  Enjoy!

Enchantment Learning & Living is an inspirational blog celebrating life’s simple pleasures, everyday mysticism, and delectable recipes that are guaranteed to stir the kitchen witch in you. If you enjoyed what you just read and believe that true magic is in the everyday, subscribe to my newsletter below for regular doses of enchantment. Want even more inspiration? Follow me on Instagram, Facebook, Pinterest, and Twitter. Here’s to a magical life!

Homemade Bug Repellent ~ Just Say No to DEET

A couple weeks ago, I was enjoying a glorious summer evening in the backyard with my family. We indulged in a luxurious meal on the patio and then played with my little niece long after the sun went down.  It was the perfect embodiment of the season...

...then I got home and found that I was covered in mosquito bites!  It seems like there are more of these pesky insects this summer than in previous ones.  Yuck!  It was time arm myself with my Homemade Bug Repellent.  This all-natural, non-toxic spray is perfect for stashing in your picnic tote or spritzing on before some late-night stargazing...or any other time you want to frolic in the wilderness.  Why do I prefer to make my own bug repellent?  The answer is two-fold: I have all the ingredients readily on hand (many of them are also used for my homemade body butters and other goodies) and I've long since given up on the toxic DEET (see what Wellness Mama has to say about how this chemical spray negatively impacts the environment and your body).

I whipped up a pretty basic recipe after looking at others from Scratch Mommy, Thank Your Body, and Wellness Mama.  I used vegetable glycerin to as a binding agent rather than oil and mixed it with what essential oils I had on hand.  The glycerin binds the water and oils together and ensures that the spray sticks to your clothes and skin.  The key factor here in keeping away bugs is the strong scents of the essential oils so you will want to reapply every hour or so to keep the scents strong.  I used citronella--a common ingredient in natural bug sprays--and lemongrass. (Both of these plants can also be grown in your garden as a natural herbal repellent FYI.)  I love the citrusy scent!  You can also add in other essential oils like eucalyptus or lavender.  The measurements here are for a 4oz spray bottle.

Ingredients:

Water

1 tablespoon vegetable glycerin 

30 drops citronella essential oil

30 drops lemongrass essential oil

Mix glycerine and essential oils in a 4oz spray bottle, then fill bottle to the top with water.  Shake well.  Apply regularly (at least once an hour) when you plan on being outdoors.  What more homemade bug repellent ideas?  Check out the Prairie Homestead's list of natural bug spray recipes.  

Enchantment Learning & Living is an inspirational blog celebrating life’s simple pleasures, everyday mysticism, and delectable recipes that are guaranteed to stir the kitchen witch in you. If you enjoyed what you just read and believe that true magic is in the everyday, subscribe to my newsletter below for regular doses of enchantment. Want even more inspiration? Follow me on Instagram, Facebook, Pinterest, and Twitter. Here’s to a magical life!

Easy Homemade Dishwasher Detergent

In an effort to make my home eco-friendlier, I've begun making my own cleaning supplies. Not only is it cost-effective, but I feel like I'm taking care of myself and my planet by being more conscious about what I use to care for my home--including the dishes I wash.  

As a fan of home cooking--the ritual of preparing a nourishing meal and the health benefits of doing so--I can rack up a lot of dirty dishes just by spending an hour in the kitchen.  I've found that many green dishwasher detergents include unnecessary and, in some cases, harmful ingredients.  Thus was born my quest to find a more sustainable solution to the sinkful of dishes waiting for a good cleaning.  

This recipe for my eco-friendly dishwasher detergent is a love child born from mixes by Wellness Mama, Thank Your Body, and Overthrow Martha.  After months of testing, I found the perfect recipe that gets dishes clean and, with a little help from vinegar, sparkling.  An added bonus to this recipe is that, since you aren't buying packaged detergent, you are also cutting down on packaging waste.  I buy the ingredients in bulk and mix as needed, storing it in a mason jar.  

As with all my recipes, this one shouldn't take you more than a handful of minutes to whip up. Homemade anything is wonderful...as long as it isn't too labor intensive!

ingredients:

1 cup washing soda

1 cup citric acid

1 cup baking soda

1/2 cup sea salt

Combine all ingredients in a large mason jar (or another container) and shake vigorously.  Makes three cups (roughly 24 loads). Pour approximately 2 tablespoons per load.  Add vinegar in your dish washer's rinse compartment to avoid clouding on dishes.  Enjoy!

Enchantment Learning & Living is an inspirational blog celebrating life’s simple pleasures, everyday mysticism, and delectable recipes that are guaranteed to stir the kitchen witch in you. If you enjoyed what you just read and believe that true magic is in the everyday, subscribe to my newsletter below for regular doses of enchantment. Want even more inspiration? Follow me on Instagram, Facebook, Pinterest, and Twitter. Here’s to a magical life!

Comment
Share

Two-Ingredient Laundry Detergent

I've fallen in love with homemade laundry detergent.  Why?  Because it's earth-friendly, cost-effective, easy to make and even easier to use.  With a few minutes and two simple ingredients, you've got yourself a great detergent that is gentle on your clothes, your wallet, and the planet. Still not convinced that homemade is better?  See what Wellness Mama has to say.

I avoided making any liquid laundry soaps because they are too labor intensive and more difficult to store.  I also chose a Borax-free recipe, because this ingredient is so controversial, as Crunchy Betty can tell you.  That, and I try to only use ingredients that I readily have on hand.  I'd rather use baking soda and castile soap than have to buy additional ingredients.  It reduces clutter and keeps things simple for me.

I adapted my recipe from ones by Thank Your Body and Mommypotamus, finding that the fewer the ingredients and the quicker the recipe, the easier it is for me to be eco-friendly.  This recipe makes enough detergent for about 50 loads at roughly 5 cents a load.  Of course, you can always double or triple the recipe to save yourself time and energy.  All in all, after using this on my clothes for six months now, I can never go back to traditional detergent.  

Ingredients:

1 bar Dr. Bronner's Castile Soap (5 ounces)

2 cups washing soda

Using a fine grater, grate the full bar of soap.  Mix with 2 cups washing soda in a bowl until combined.  To use, pour 1 tablespoon in washing machine before adding clothes.  Makes about 3 cups (48 loads of laundry).  Enjoy!

Enchantment Learning & Living is an inspirational blog celebrating life’s simple pleasures, everyday mysticism, and delectable recipes that are guaranteed to stir the kitchen witch in you. If you enjoyed what you just read and believe that true magic is in the everyday, subscribe to my newsletter below for regular doses of enchantment. Want even more inspiration? Follow me on Instagram, Facebook, Pinterest, and Twitter. Here’s to a magical life!

Comment
Share

Writing at the Kitchen Table

Sure you have your own writing desk, one lovingly crafted over the years.  You can still see evergreen where it bleeds through the turquoise you painted over it, a tribute to the expansive lightness of your beloved skies.  The inevitable wear and tear of scratches and well-worn grooves where your feet rest on your chair are as familiar to you as the lines on the palm of your hands. And the scattered gemstones, carelessly placed daisies, and stacks of half-read books only add to this still life, a study of a writer's mind. 

But sometimes you need to forgo the creative splendor of that desk for the warmth and sanctity of the kitchen table.  Here you can spread out and make your journal and pen at home with the salt and pepper shakers.  Your hands can smooth the wrinkles from the homemade mustard and ochre tablecloth strewn with embroidered vines and buds impatient to burst open, a gift from your mother; this homey task is a welcome respite for your fingers, much more soothing than finding their way around the roughness of each wooden groove and lost story on your writing desk.  

The only music is the whistle of the kettle and the sound of you and your words breathing in unison.  Perhaps there is even some stew simmering on the stove, perfuming your cozy space with comfort and garlic.  There is no room for dainty tea cups here, just as there is no time for a lady-like cup of Earl Grey.  Only fat mugs will do, enough to hold the rich brew you concoct out of oat straw, alfalfa leaves, and astralagus root.  This is working tea.  It fills you up with nourishment from the earth and protects you from the elements.  Each sip brings you closer to the ground, where you write best.  

It is easier to plant your letters in that minerally dirt and watch words bloom.  Their sun is the glitter from the mica mugs from which you slurp your tea.  And you watch with the pleasure of a gardener who has pulled the last weed from her plot of land, as those words unfurl into sentences, and burst into story just as the tight buds on the tablecloth erupt into bloom.

Only at the kitchen table can you get your hands dirty and your mind clear.

Enchantment Learning & Living is an inspirational blog celebrating life’s simple pleasures, everyday mysticism, and delectable recipes that are guaranteed to stir the kitchen witch in you. If you enjoyed what you just read and believe that true magic is in the everyday, subscribe to my newsletter below for regular doses of enchantment. Want even more inspiration? Follow me on Instagram, Facebook, Pinterest, and Twitter. Here’s to a magical life!

Biscochito Coffee

Nothing says the holidays in New Mexico like a fresh batch of biscochitos.  I look forward to those anise dotted sugar cookies every year.  In fact, it's pretty much the only time I eat those treats, so each bite seems laced with memories of unwrapping presents and lingering over cups of tea by the fireside. 

Another way to enjoy that biscochito flavor throughout the holiday season is to lace your coffee with the anise seeds, something my family has been doing for years to add to the festive quotient of our morning cup of cheer. The fun in making you own holiday coffee blends is that you can create your own flavors (hello pumpkin spice and Aztec mocha coffees) and control the quality of ingredient.  Most commercial flavored coffees are made with artificial ingredients and poor quality beans--yuck!   You can also play with the strength of your flavors, from just a kiss of anise flavor in each sip to tasting the equivalent of one biscochito in each cup.

Don't forget to use good quality coffee here. I go for the Santa Fe-based Aroma Coffee's organic Black Lighting dark roast.  Seriously, it has ruined me for other coffee.  Once you try the good stuff, you can't go back to the so-so.  This is an excellent last-minute gift as well since the prep work is virtually nada (you can keep the beans whole or grind them) and everyone appreciates a tasty beverage high on the festive quotient, but a welcome break from the heavier eggnogs and hot chocolates.

Ingredients:

12 oz quality coffee

2 oz anise seeds

Mix ingredients together and store in an airtight container.  You can grind your coffee right away before mixing, or grind as you go with each pot you brew.  Just make sure to get some anise in each batch you grind as it might settle to the bottom of your container.  Don't hesitate to play with the proportions to find the perfect balance between coffee and spice for you.  Brew as you normally would.  Enjoy!

Enchantment Learning & Living is an inspirational blog celebrating life’s simple pleasures, everyday mysticism, and delectable recipes that are guaranteed to stir the kitchen witch in you. If you enjoyed what you just read and believe that true magic is in the everyday, subscribe to my newsletter below for regular doses of enchantment. Want even more inspiration? Follow me on Instagram, Facebook, Pinterest, and Twitter. Here’s to a magical life!

Lavender Blue Corn Soap

For my latest entry in my kitchen gifts series, I decided to whip up a batch of lavender blue corn soap.  This is the perfect gift for anyone who is not necessarily a big fan of the more seasonal soaps like my orange spice, peppermint hot chocolate, or pine and charcoal soaps (as if such a person actually existed...seriously, who doesn't love the warming scents of winter?).  It's also an ideal gift for people to enjoy long after the holiday is gone; once all the other festive treats have been used, they can turn to this soap and the promise of spring.

Okay, I admit it: I got the idea for this soap after my favorite doughnut, a sinful blend of lavender and blue corn made by a local bakery.  Blue corn has always struck me as a very New Mexican ingredient, so this soap always makes me feel like I'm gifting a little bit of the Southwest magic I live in.  You can, of course, always substitute regular cornmeal if you can't find the blue kind.  You don't have to get fancy with molds, either.  You can simply use a muffin tin unless you want to get playful with your molds like I did with the soaps pictured.

For this recipe, I use a natural shea butter melt and pour soap base which I got here (remember how I like to keep my crafting simple?  Well, a melt and pour solution gives you the fun factor of making your own soap without the more labor intensive and tricky ingredients like lye to work with).  Make sure to buy the suspension formula for your soap base so that the blue corn is evenly spread out in your soap rather than sinking to the bottom.  The lavender oil is an excellent antibacterial agent and nerve tonic, while the blue corn acts as a gentle exfoliate perfect for everyday use.

Ingredients:

16 ounces (1 lb) shea butter soap base

1/2 cup blue corn

100 drops lavender essential oil

Chop shea butter soap base into half-inch chunks and place in a microwave-safe bowl.  Heat for one minute and stir.  Then continue to melt base in the microwave in 20-second increments, stirring between each heating until liquefied, about 5 minutes.  Once the soap is melted stir in essential oils and blue corn.  Pour into muffin tins (or other molds) and allow to set, about an hour.  (You can speed this up by placing them in the fridge for about 20 minutes.)  Remove soap from molds by gently inserting a butter knife around the edges of the muffin tin until the soap pops out.  Wrap individually in parchment paper or tuck multiples in an airtight container.  Store in a cool, dry place indefinitely.  Makes about 6 small soaps or 4 medium sized ones.  Enjoy!

Enchantment Learning & Living is an inspirational blog celebrating life’s simple pleasures, everyday mysticism, and delectable recipes that are guaranteed to stir the kitchen witch in you. If you enjoyed what you just read and believe that true magic is in the everyday, subscribe to my newsletter below for regular doses of enchantment. Want even more inspiration? Follow me on Instagram, Facebook, Pinterest, and Twitter. Here’s to a magical life!

Homemade Vanilla Extract

Today I have another entry in what is becoming my annual holiday kitchen gifts series (aka gifts from the heart).  This is the time of year when we can become over-saturated with marketing ploys trying to convince us to buy! buy! buy! To which I say: no thanks. 

I've never been one for malls or big shopping extravaganzas (with the exception of grocery shopping and some fond memories of girl days with my sisters when we were teens).  This is also the time of year when we should be indulging in the gentle rejuvenation and restoration that the winter months invite, but instead are all too often pulled into the frazzled energy that can be the holiday buzz.

My anecdote to this frenetic energy has always been in making gifts, particularly ones that people can enjoy long after the last holiday cookie has been eaten and the final decoration has been packed away.  Time in the kitchen soothes and relaxes while slowing down and making gifts is a wonderful way to meditate on all the love in your life.  

Of course, you also want to make sure that whatever you are making isn't too complicated, otherwise you defeat the purpose of simplifying your holiday.  I personally only make things that allow plenty of time for tea drinking and playing with my niece, so I don't I lose all the fun of hanging out in the kitchen.

This recipe for homemade vanilla extract fits the bill for easiness and deliciousness; it's a gift you can whip up in no time and that your friends and family with love receiving.  The flavor of a homemade vanilla extract is so much richer and smoother than the store bought kind--and surprisingly less expensive.  Genuine vanilla extract can be pricey and the imitation stuff is no good (just think of all the artificial flavors and coloring they use).

The only difference between making my Vanilla Bourbon and vanilla extract is the dose.  One vanilla bean is strong enough to gently infuse a few cups of spirits with its flavor.  More vanilla beans in less alcohol offer a concentrated flavor perfect for baking.  I used organic Prairie vodka in this recipe, but you can play with the flavor of your extract by using rum or bourbon instead. 

Ingredients:

1 vanilla bean per 1 oz vodka

Slice vanilla beans almost completely in half lengthwise.  This ensures that the vodka can soak up the flavor from the little seeds on the beans' inside and makes it easier to remove the vanilla from the alcohol once it has done soaking (as opposed to slicing it completely in half).  Place beans in mason jar and pour vodka over it (I used four beans for four ounces of vodka pictured below).  Seal jar and let sit for a week, making sure to shake jar periodically.  Then strain the vodka by pouring it through cheesecloth draped funnel into a clean jar.  Store in a cool, dry place.  Lasts indefinitely (though I doubt you will be able to keep it around that long!). 

Enchantment Learning & Living is an inspirational blog celebrating life’s simple pleasures, everyday mysticism, and delectable recipes that are guaranteed to stir the kitchen witch in you. If you enjoyed what you just read and believe that true magic is in the everyday, subscribe to my newsletter below for regular doses of enchantment. Want even more inspiration? Follow me on Instagram, Facebook, Pinterest, and Twitter. Here’s to a magical life!

Comment
Share

Vanilla Infused Bourbon

We've had glorious weather this week, from a lush snowstorm that swept over the city, creating an air of frivolity and lightness (let's just say there was more than one pool going to see if we would get a snow day--we didn't, but the blissful fat flakes seemed to cool the minds of everyone burning too hot at the end of the semester), to the gentle windy days that tickled fiery autumn leaves from their branches.  It has been nothing short of mystic!

This cold weather has made me want to curl up by the fire and enjoy the hush that seems to settle over the earth when autumn transitions to winter--something we too seldom indulge in as we get swept up in the flurry of the work week and the upcoming holiday season.  It goes without saying that a book and a delicious beverage would make fireside snuggling nothing short of epic.  Tea works well here (you know how much I love those cups akin to a warm hug for the soul), but if you are looking for something a little more festive, look no further than this vanilla bourbon.

It is super easy to make and tastes of the season, full of the lush caramel and vanilla flavors we crave in our holiday desserts.  You can make a sinfully vanilla old fashioned or give my cinnamon-apple cocktail an extra dash of yum with this vanilla bourbon. Of course, it is equally delicious on its own. 

As with all my recipes, the trick is getting good quality ingredients.  I used Maker's Mark bourbon (nice, but not so nice that you wouldn't want to infuse it with anything) and organic vanilla beans which I got here.  Make sure the vanilla bean is soft and plump.  A brittle bean is a sign that it has gone stale and the flavor won't be as strong.  The rest is easy: simply forget about the bourbon for a week while it soaks up all the lovely vanilla flavor.  My advice?  Mix up a double batch so you have some for yourself and another for a friend.  This bourbon is so good, you'll want to gift it to friends and family this holiday season.

Ingredients:

2 cups bourbon

1 vanilla bean

Slice vanilla bean almost completely in half lengthwise.  This ensures that the bourbon can soak up the flavor from the little seeds on the bean's inside and makes it easier to remove the vanilla from the bourbon once it has done soaking (as opposed to slicing it completely in half).  Place in mason jar and pour bourbon over it.  Seal jar and let sit for a week, making sure to shake jar periodically.  Then strain the bourbon by pouring it through cheesecloth draped funnel into a clean bottle.  Store in a cool, dry place.  Lasts indefinitely (though I doubt you will be able to keep it around that long!).  Makes two cups.

Enchantment Learning & Living is an inspirational blog celebrating life’s simple pleasures, everyday mysticism, and delectable recipes that are guaranteed to stir the kitchen witch in you. If you enjoyed what you just read and believe that true magic is in the everyday, subscribe to my newsletter below for regular doses of enchantment. Want even more inspiration? Follow me on Instagram, Facebook, Pinterest, and Twitter. Here’s to a magical life!

Honey Caramel Apples

image.jpg

Every fall I get this craving for caramel apples.  They are the quintessential autumnal treat, a perfect blend of tart, crisp fruit, chewy sweet caramel, and--if you like a little extra flash--crunchy nuts.  While I do have the perfect neighborhood spot to get caramel apples, I've always wanted to make my own. 

I've tried my hand at homemade caramel apples several times over the years but had the kind of issues I now know are common among first time caramel apple makers.  The caramel would either be so soft that it would slide right off the apples or too hard, making it difficult to bite into.  Of course, there were other issues only hippy clean-eating cooks like myself were concerned with, like not using corn syrup or having too many ingredients to count.  So there I was, ready to give up the pursuit of a perfect homemade caramel apple when I saw this delightful recipe from 101 Cookbooks (thank you Pinterest!).  My taste buds are already looking forward to another batch of these honey kissed caramel apples. 

This recipe has everything I was looking for: quality ingredients, foolproof instructions, and perfectly chewy caramel that stays on the apple.  Best of all?  It only takes three ingredients: honey, cream, and salt.  I usually make the salt optional in my recipes but find it works well here to balance the sweetness of the honey.  You can also add a little more to give your dessert a stronger salted caramel flavor.  Always use local honey for best quality and taste.  You can even experiment with types of honey to get different flavors.  The darker the honey, the more intense the honey flavor will be.  I like to use small local apples because they make the perfect single serving and you can't beat the flavor.  Feel free to use bigger ones so long as you stick with tart Granny Smiths.

The only sort of fancy tool you need is a candy thermometer, which you can buy super cheap at most grocery stores.  I found that keeping track of the temperature really does matter when making the caramel.  Too low a temp and you have runny caramel (great for ice cream, but not apples); too hot, the caramel become brittle.  You'll want to stick pretty close to the instructions on this one, unlike my other recipes when you have more wiggle room to adapt to your own tastes.  The creative part comes at the end when you can add nuts (I used sunflower seeds, pictured here), chocolate drizzles or other toppings to your apples.

image.jpg

Ingredients:

5-10 apples, washed and dried

1 cup heavy cream

1 cup honey

1/2 tsp sea salt

Line a baking sheet with parchment paper.  Push a popsicle stick into the top of each apple.  Fill a large bowl 1/2 full with ice water and set aside.

In a saucepan, heat the cream and salt until bubbly--not quite a simmer.  Add honey.  Bring the mixture to a boil. Reduce the heat to a simmer and stir constantly for about 15-20 minutes or until the mixture reaches about 255-260F degrees (this is where the thermometer comes in handy; just latch it to the side of your saucepan). To stop the caramel from cooking, carefully set the bottom of the saucepan in the bowl of cold water you prepared earlier.  Make sure not to get any of the water in the caramel. Keeping stirring until caramel thickens.  (You can always put the caramel back on the stove for a few seconds if it gets too thick, but I found it needed to be really chilled and thick for it to stick to the apples.)

Tilt saucepan so all the caramel goes to one side and dunk each apple into the cooling caramel until fully coated.  Place each apple on the parchment lined baking sheets and allow the caramel to cool and set at least 20 minutes.  When it is almost set (wait at least 10 minutes), you can add extra toppings.

Makes 5-10.  Enjoy!

Enchantment Learning & Living is an inspirational blog celebrating life’s simple pleasures, everyday mysticism, and delectable recipes that are guaranteed to stir the kitchen witch in you. If you enjoyed what you just read and believe that true magic is in the everyday, subscribe to my newsletter below for regular doses of enchantment. Want even more inspiration? Follow me on Instagram, Facebook, Pinterest, and Twitter. Here’s to a magical life!

Tomato, Tomatillo & Goat Cheese Tart

image.jpg

There is no such thing as too many tomatoes in my opinion--at least not during the long hot days of summer when these juicy fruits are in their prime. 

This recipe is a riff on both my calabicatas tart (once you have a good tart crust you can fill it with just about anything) and a goat cheese tomato tart we used to make as kids when we wanted to look like culinary pros and beat the heat with an easy one dish meal.  I've added tomatillos as an extra twist along with some pepper; both bring an unexpected spice and tartness to the dish.  That said if all you have on hand is tomatoes then, by all means, stick with the classic version of just tomatoes, onions, and goat cheese.

And speaking of goat cheese, you'll notice that I gave you a range of ounces to use in this recipe; if you want gooey-cheesy use more cheese. If you want it to just to play backup singer to the tomatoes, use less.  This dish is excellent on its own or paired with a side salad for dinner, and it makes a great left-over lunch!

image.jpg

Ingredients:

For crust:

1/2 cup blue cornmeal

1/2 cup whole wheat flour

1/2 cup white flour

1/3 cup olive oil

1/3 cup water

For filling:

2 medium tomatoes

6 tomatillos

3-5 oz goat cheese

1 medium sweet onion

1 tablespoon oregano

Pepper to taste

Salt to taste

Olive oil

Preheat oven 350 degrees.  Whisk together flours and a pinch of salt to taste.  Then add oil and water and mix until a ball forms.  Press dough evenly into a tart pan (I use one with a removable bottom for easy serving), then use a fork to prick holes into the bottom.  Cook in oven for 30-35 minutes. Remove from heat and let cool.

While the tart crust cools, dice up onions and sauté in olive oil with half a tablespoon of your oregano and pepper in saucepan until softened.  Slice tomatoes and tomatillos into thin disks.  Once the crust and the onions have cooled, pour your onions on the bottom layer of the crust, then break chunks of your goat choose and layer it over them.  Sprinkle one-fourth of a tablespoon of oregano and a pinch of pepper over the cheese; then layer the tomatillo circles over that.  Lastly, layer your tomatoes, starting in the center and working your way out to the tart crust to give it a uniform look.  Sprinkle with the last of the oregano, some pepper and salt.  Drizzle top with olive oil.

Place tart in oven and cook 35-40 minutes until egg is set.  Let cool for at least ten minutes before serving.  Serves 4-8.  Enjoy!

Enchantment Learning & Living is an inspirational blog celebrating life’s simple pleasures, everyday mysticism, and delectable recipes that are guaranteed to stir the kitchen witch in you. If you enjoyed what you just read and believe that true magic is in the everyday, subscribe to my newsletter below for regular doses of enchantment. Want even more inspiration? Follow me on Instagram, Facebook, Pinterest, and Twitter. Here’s to a magical life!

Comment
Share