Enchantment Learning & Living Blog

Welcome to Enchantment Learning & Living, the inspirational space where I write about the simple pleasures, radical self-care, and everyday magic that make life delicious.

Homemade Beeswax Candles

I love beeswax.  I use it in everything, from my body butters and lip balms to salves and mascara.  It acts as a sealant in my beauty goodies, locking in moisture and providing a protective layer against the elements. Plus it smells divine!  Like honey and warm earth. Best of all, buying local beeswax supports the bees which we need for a thriving planet and happy garden.

Homemade Beeswax Candles

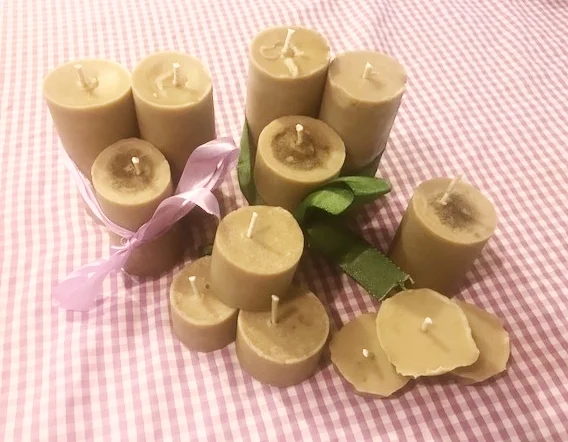
I've fallen in love with beeswax all over again, recently, after I began making these homemade candles.  I adore candles.  Their dancing light turns dinner into a celebration or nighttime reading into a cozy retreat from the world.  Their open flames seem made for whispering wishes into and their warm glow chases away the darkness like no lamplight can. In short, they are one of my sacred simple pleasures.  I enjoy the homey task of making them, especially last week, as I cleaned and prepared my home for the coming summer solstice and enjoyed a candlelit night once the sun set on the longest day of the year.

Beeswax candles are one of the purest candles out there, free from yucky chemicals and artificial ingredients of mainstream candles. They have the added benefit of purifying your home.  While most candles actually release toxins into the air while they burn, beeswax candles release negative ions as they melt which neutralizes the positive ions create by allergies and other pollutants.  Bonus: It makes your home smell like amber, soft and sweet, like the honey it comes from.

These homemade candles are ridiculously easy to make, as are all my recipes, natch.  I prefer to use old toilet paper rolls for pillar candles and egg cartons for tea lights, rather than pouring them into jars.  The jars are nice, but I hate the build-up of candle containers; plus, I just love the look of pillar candles. Feel free to use jars if you prefer them (or reuse old candle tins).

These candles make wonderful gifts.  I like to make a big batch since they are so easy to make, to have on hand for last-minute gifts or give to my family.  Once the wick on your candle has burned down, don't throw the wax out! Use it to make new candles.  Beeswax is super durable and long-lasting, so you can just keep reusing what doesn't get burned up.  This recipe also works well for any candle wax you've got lying around.  I melted down one of my favorite chakra candles and refashioned it into a new one.  It beats spending a small fortune on new candles!

I've made my beeswax candles two ways: with just the beeswax and with a little coconut oil thrown it.  The pure beeswax candles emit a softer, lighter glow, while the ones with coconut oil burn brighter and faster.  If you use a jar, you will for sure want to use coconut oil so that you can more easily remove leftover wax once the candle is done burning.

Ingredients:

Beeswax, preferably local

Coconut oil (optional, using only 1 part oil to 4 parts beeswax for best consistency)

Special Tools:

Toilet paper or paper towel rolls

Egg cartons

Large tin can

Old saucepan

Organic candle wicks

Parchment or wax paper

Baking sheet

Skewers or string (to keep wicks straight)

To make, roughly chop wax and place in the large tin can.  Fill saucepan halfway with water and place on stove.  Put can in saucepan.  Burner should be on medium heat.  Stir occasionally until wax melts. The time on this varies, depending on how much beeswax you use and how small the wax pieces are. It will take at least twenty minutes. I typically put it on when writing so it can melt while I work.  

If you are using coconut oil, melt it in a separate tin can only once your beeswax is melted, as the coconut oil melts more quickly.  Once it's melted, combine with the wax and stir. 

Remove melted wax from heat and let sit about five minutes to cool.  While your wax (and coconut oil, if you are using it) is cooling, spread parchment paper across a baking sheet and line up your paper rolls.  You can also use the bottom of an egg carton if you want smaller candles. 

To make candles, pour a dime-sized bit of wax into the bottom of the rolls sitting on parchment paper or in the egg cartons.  Then place the metal bottom of your wicks into the wax.  This will serve as a solid base. Once you've done it for all your candle molds, line one or two skewers or other straight objects across the middle of your rolls (or carton) so that your wicks are neatly sandwiched between them.  This will ensure that they stay centered.  For smaller candles, simply cut the desired wick size and place it in the cooling wax. 

Candle Making Process

Pour wax slowly into molds.  Note: If the wax isn't cool enough, it may leak out of bottom rolls, so make sure it has enough time to cool.  I forgot to the first time I made these and had wax puddles forming outside the molds--luckily I could just let it harden, scrape it off, and remelt it!  

Wax in Egg Carton

Once the beeswax is poured into the molds, let them sit until hardened, usually an hour or two.  I keep them on the baking sheet so that I can move them someplace where they won't be in the way.  Once they've hardened and cooled, simply peel away the carton or roll and you've got yourself a lovely collection of beeswax candles!

Finished Candles

Enchantment Learning & Living is an inspirational blog celebrating life’s simple pleasures, everyday mysticism, and delectable recipes that are guaranteed to stir the kitchen witch in you. If you enjoyed what you just read and believe that true magic is in the everyday, subscribe to my newsletter below for regular doses of enchantment. Want even more inspiration? Follow me on Instagram, Facebook, Pinterest, and Twitter. Here’s to a magical life!

Comment
Share

A Summer of Sacred Simple Pleasures

At the start of last summer, I'd just completed the major edits on my first book, Everyday Enchantments, and needed time to goof around and recharge after such a big accomplishment. Needless to say, I wasn't doing much writing! This summer, however, I find myself longing for unstructured time and, frankly, more quiet time. It was a lively action-packed teaching year, to say the least, and it has taken me time to decompress from the excitement.

I find myself indulging in long afternoons writing to the soundtrack of lazy birdsong and late nights reading juicy novels...and mornings? They've been spent losing track of time. In the garden. At the writing desk. In the kitchen. You name it. I'm an introvert at heart and find I've needed to nourish that aspect of myself more. My quiet soul needs time to talk to the ladybugs that find their way into my lap and dance under the moon.  Not that I don't love my adventures--I've had plenty of those too and look forward to more over the summer.

This time away from the work desk has made me realize how structured my life is--happily so, I'm a creature of routine after all! But I realized my life had been more than structured: every minute, every second seemed like it had been taken up with one task or another. Yuck! I love my routine, but an integral part of making your routine a ritual is in allowing space, time, light to flow throughout your day.

That's why this summer, I've decided to embrace the gentler pace the season promises and relish anything and everything that makes me slow down and tune into myself. I want to linger over a glass of wine while watching the sunset and greet the morning birds with songs of my own--and a cup of coffee, natch.

I want to spend time in the kitchen playing with recipes and spells I don't normally have time to make and conjure. I want to wear flowers in my hair and feel blades of grass between my toes.  I want to prioritize delicious living and tiny daily delights. Why? Because I'm coming to see simple pleasures as something sacred.

And we should make more time for sacred things. We need to in order for our souls to grow and flourish. So unleash yourself. Let go of heavy mundane things that make it impossible for you to sleep in on a Sunday or linger over a cup of tea. Resist the temptation to fill up your calendar with one thing after another.

Slow down. Give up schedules--at least for a day or a few hours here and there (I know we all aren't off for the summer!). Remember what it was like to be the kid running around in the backyard, blowing bubbles and twirling for no reason except that it's fun. Get lost on a long walk. Find yourself in a good book. Listen--just listen and nothing else--to an old record because you haven't done it in forever. Whisper secrets into a candle and let it whisper back.

Treasure these moments. Honor them. They are sacred. Pleasure is sacred. And simple pleasures are one of the most profound experiences of all.

Here's to a summer of sacred simple pleasures!

A Summer of Sacred Simple Pleasures

Enchantment Learning & Living is an inspirational blog celebrating life’s simple pleasures, everyday mysticism, and delectable recipes that are guaranteed to stir the kitchen witch in you. If you enjoyed what you just read and believe that true magic is in the everyday, subscribe to my newsletter below for regular doses of enchantment. Want even more inspiration? Follow me on Instagram, Facebook, Pinterest, and Twitter. Here’s to a magical life!

Comment
Share

Vegan Bacon Recipe

I know, I know. Vegan bacon is a total oxymoron! Strange name aside, I can promise you that it tastes delicious. I began my quest for healthier breakfast sides after I realized this past winter that I was eating more and more bacon come the weekend which was bad for my waistline and health. Then I realized what I really loved about bacon is that it made me feel fancy. Breakfast could be a decadent diner plate with scrambled eggs, buttery toast, and yes, bacon. 

So then the quest began. How do I make a healthier weekend breakfast side? I was inspired by these recipes from Minimalist Baker and Veganosity, but as always, modified them so that I didn't have to buy any special ingredients--those things that usually end up getting used once and then thrown out (yet another attempt for me to waste less is to buy only condiments and ingredients I know I'll use). An added bonus to this recipe? Eating less meat is better for the environment all around, not just for your health.

Typically I avoid most things called vegan because they end up being highly processed. I would also rather eat something that tastes like what it is, like tofu for example, rather than beef flavored tofu. I mean, how many gross additives and artificial ingredients go into making fake meat? Yuck! All that artificial stuff is hardly good for the environment either. There are, of course, a few exceptions, like this bacon and my vegan fudge, both of which use only natural ingredients and only foodstuff that I already have in my pantry: maple syrup, amino acids, garlic, and chipotle chile powder. Together these ingredients make for a sweet smokey flavor akin to bacon. If you have never used amino acids before, give them a try! I started using Braggs liquid amino acids as a healthier substitute for soy sauce and haven’t looked back since. 

This recipe works well with eggplant (pictured here) as well as mushrooms. I have even seen people use carrots and turnips, though I have yet to try those options. You can slice these longways or, as I prefer, in circular discs. The big thing you need to make sure you do is to use a mandolin or other sharp cutting tool to produce thin, even slices so your pieces cook evenly. If they are too thick, they won’t have that crispy bacon feel.  

All in all, this vegan bacon is the perfect blend of crispy, salty, and smokey--and it goes great with scrambled eggs and toast! 

ingredients: 

1 eggplant, thinly sliced  

1/4 cup Braggs liquid amino acids

1/4 cup maple syrup

1/2 tablespoon smoke chipotle powder

1-2 cloves garlic, minced

Combine all ingredients, except the eggplant, in a shallow pan or bowl. Then place eggplant slices in mixture and let marinate at least 30 minutes. I usually let them marinate overnight for best flavor. To cook, squeeze the moisture from eggplant piece so they are as dry as possible. This will ensure that they get crispy while cooking, not soggy. Heat oil in frying pan on medium. Once the pan is hot, place first round of eggplant on pan’s surface and cook without flipping for 1-2 minutes, watching carefully so that pieces crisp up, not burn. Flip pieces and repeat on the second side until browned. These are best eaten hot with scrambled eggs and toast. Serves 4-6. Enjoy!

Eggplant Dish

Enchantment Learning & Living is an inspirational blog celebrating life’s simple pleasures, everyday mysticism, and delectable recipes that are guaranteed to stir the kitchen witch in you. If you enjoyed what you just read and believe that true magic is in the everyday, subscribe to my newsletter below for regular doses of enchantment. Want even more inspiration? Follow me on Instagram, Facebook, Pinterest, and Twitter. Here’s to a magical life!

Comment
Share