Enchantment Learning & Living Blog

Welcome to Enchantment Learning & Living, the inspirational space where I write about the simple pleasures, radical self-care, and everyday magic that make life delicious.

Tomato & Mozzarella Salad

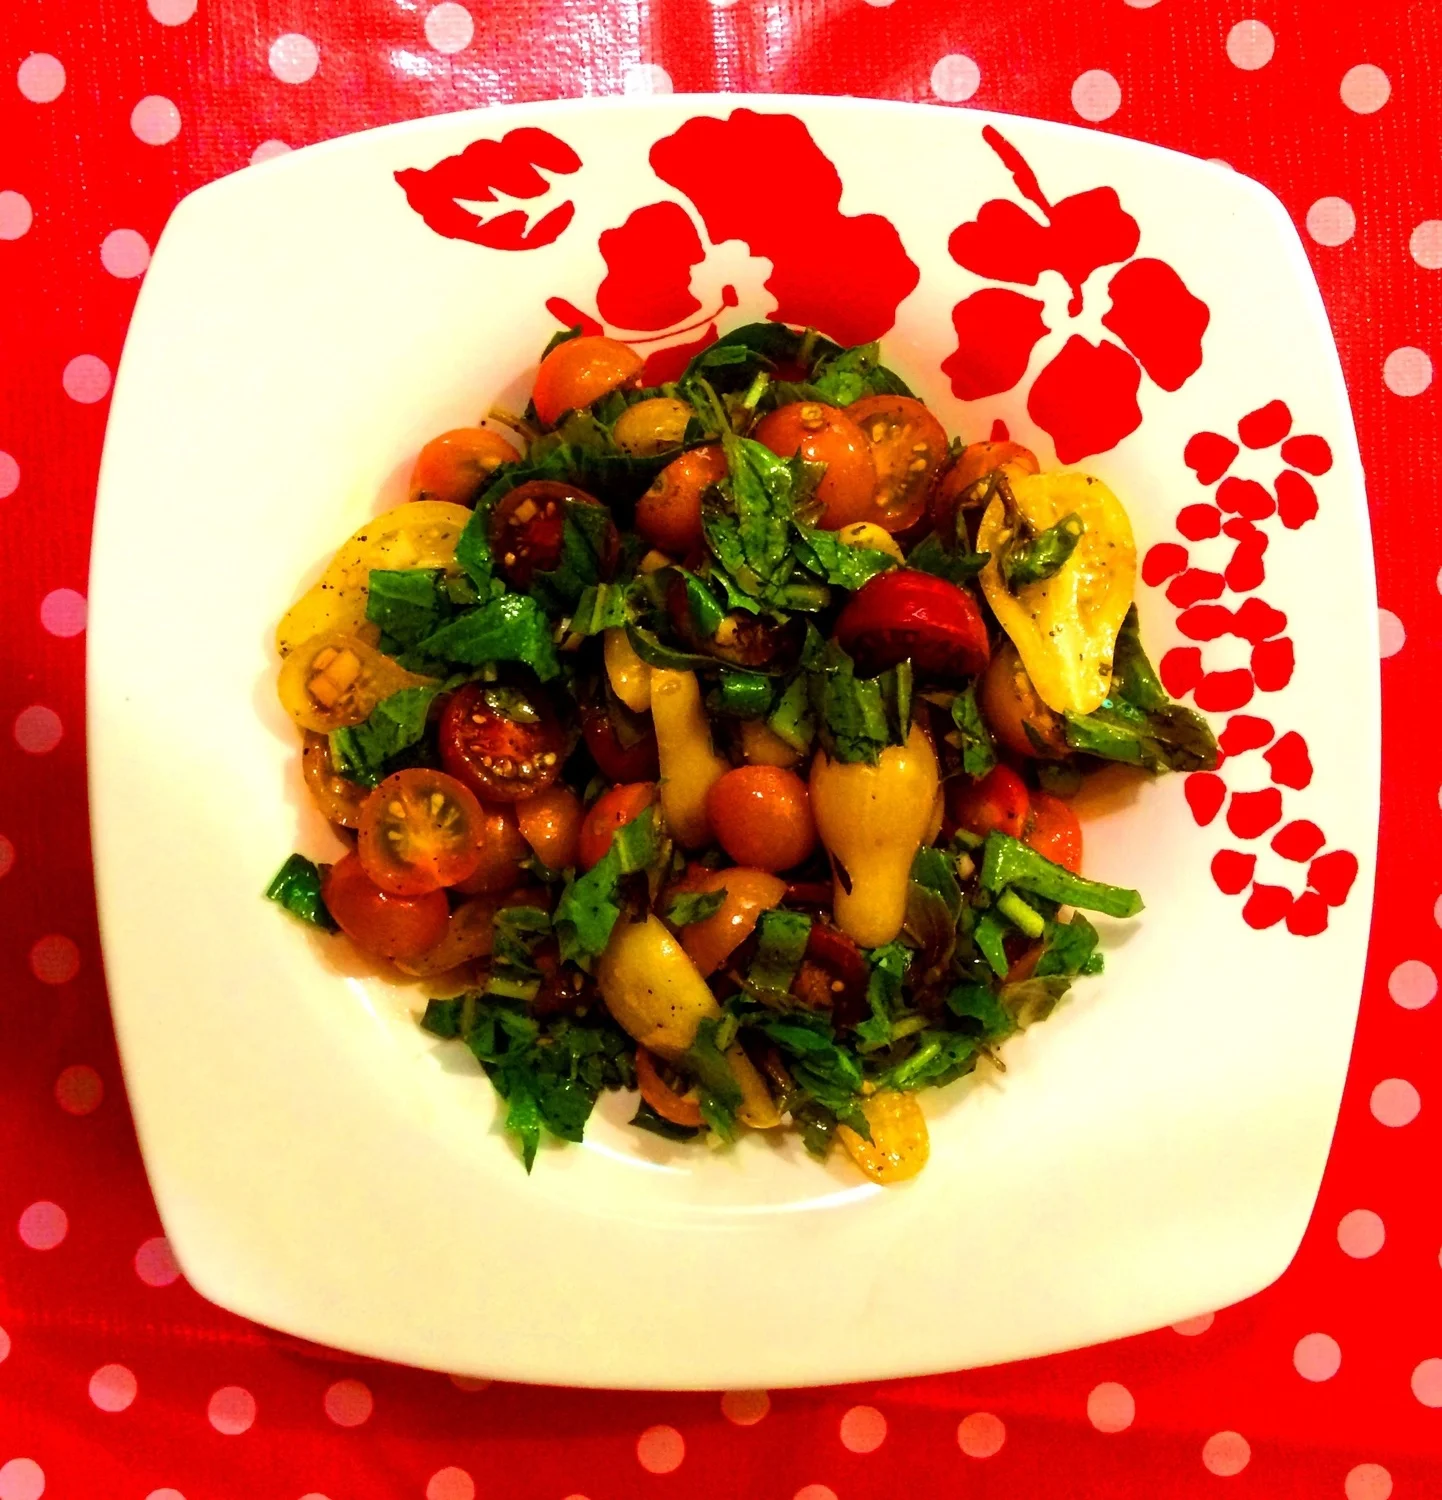
Earlier in the week, I posted my Cherry Tomato Summer Salad, an easy, refreshing dish that highlights that flavors of this perfect summer fruit.  Since you know my love for a good tomato borders on the pornographic (remember my effusions on the first tomatoes from my own garden?), I thought I'd offer you another tomato salad recipe, this one just as simple and delicious as the last. 

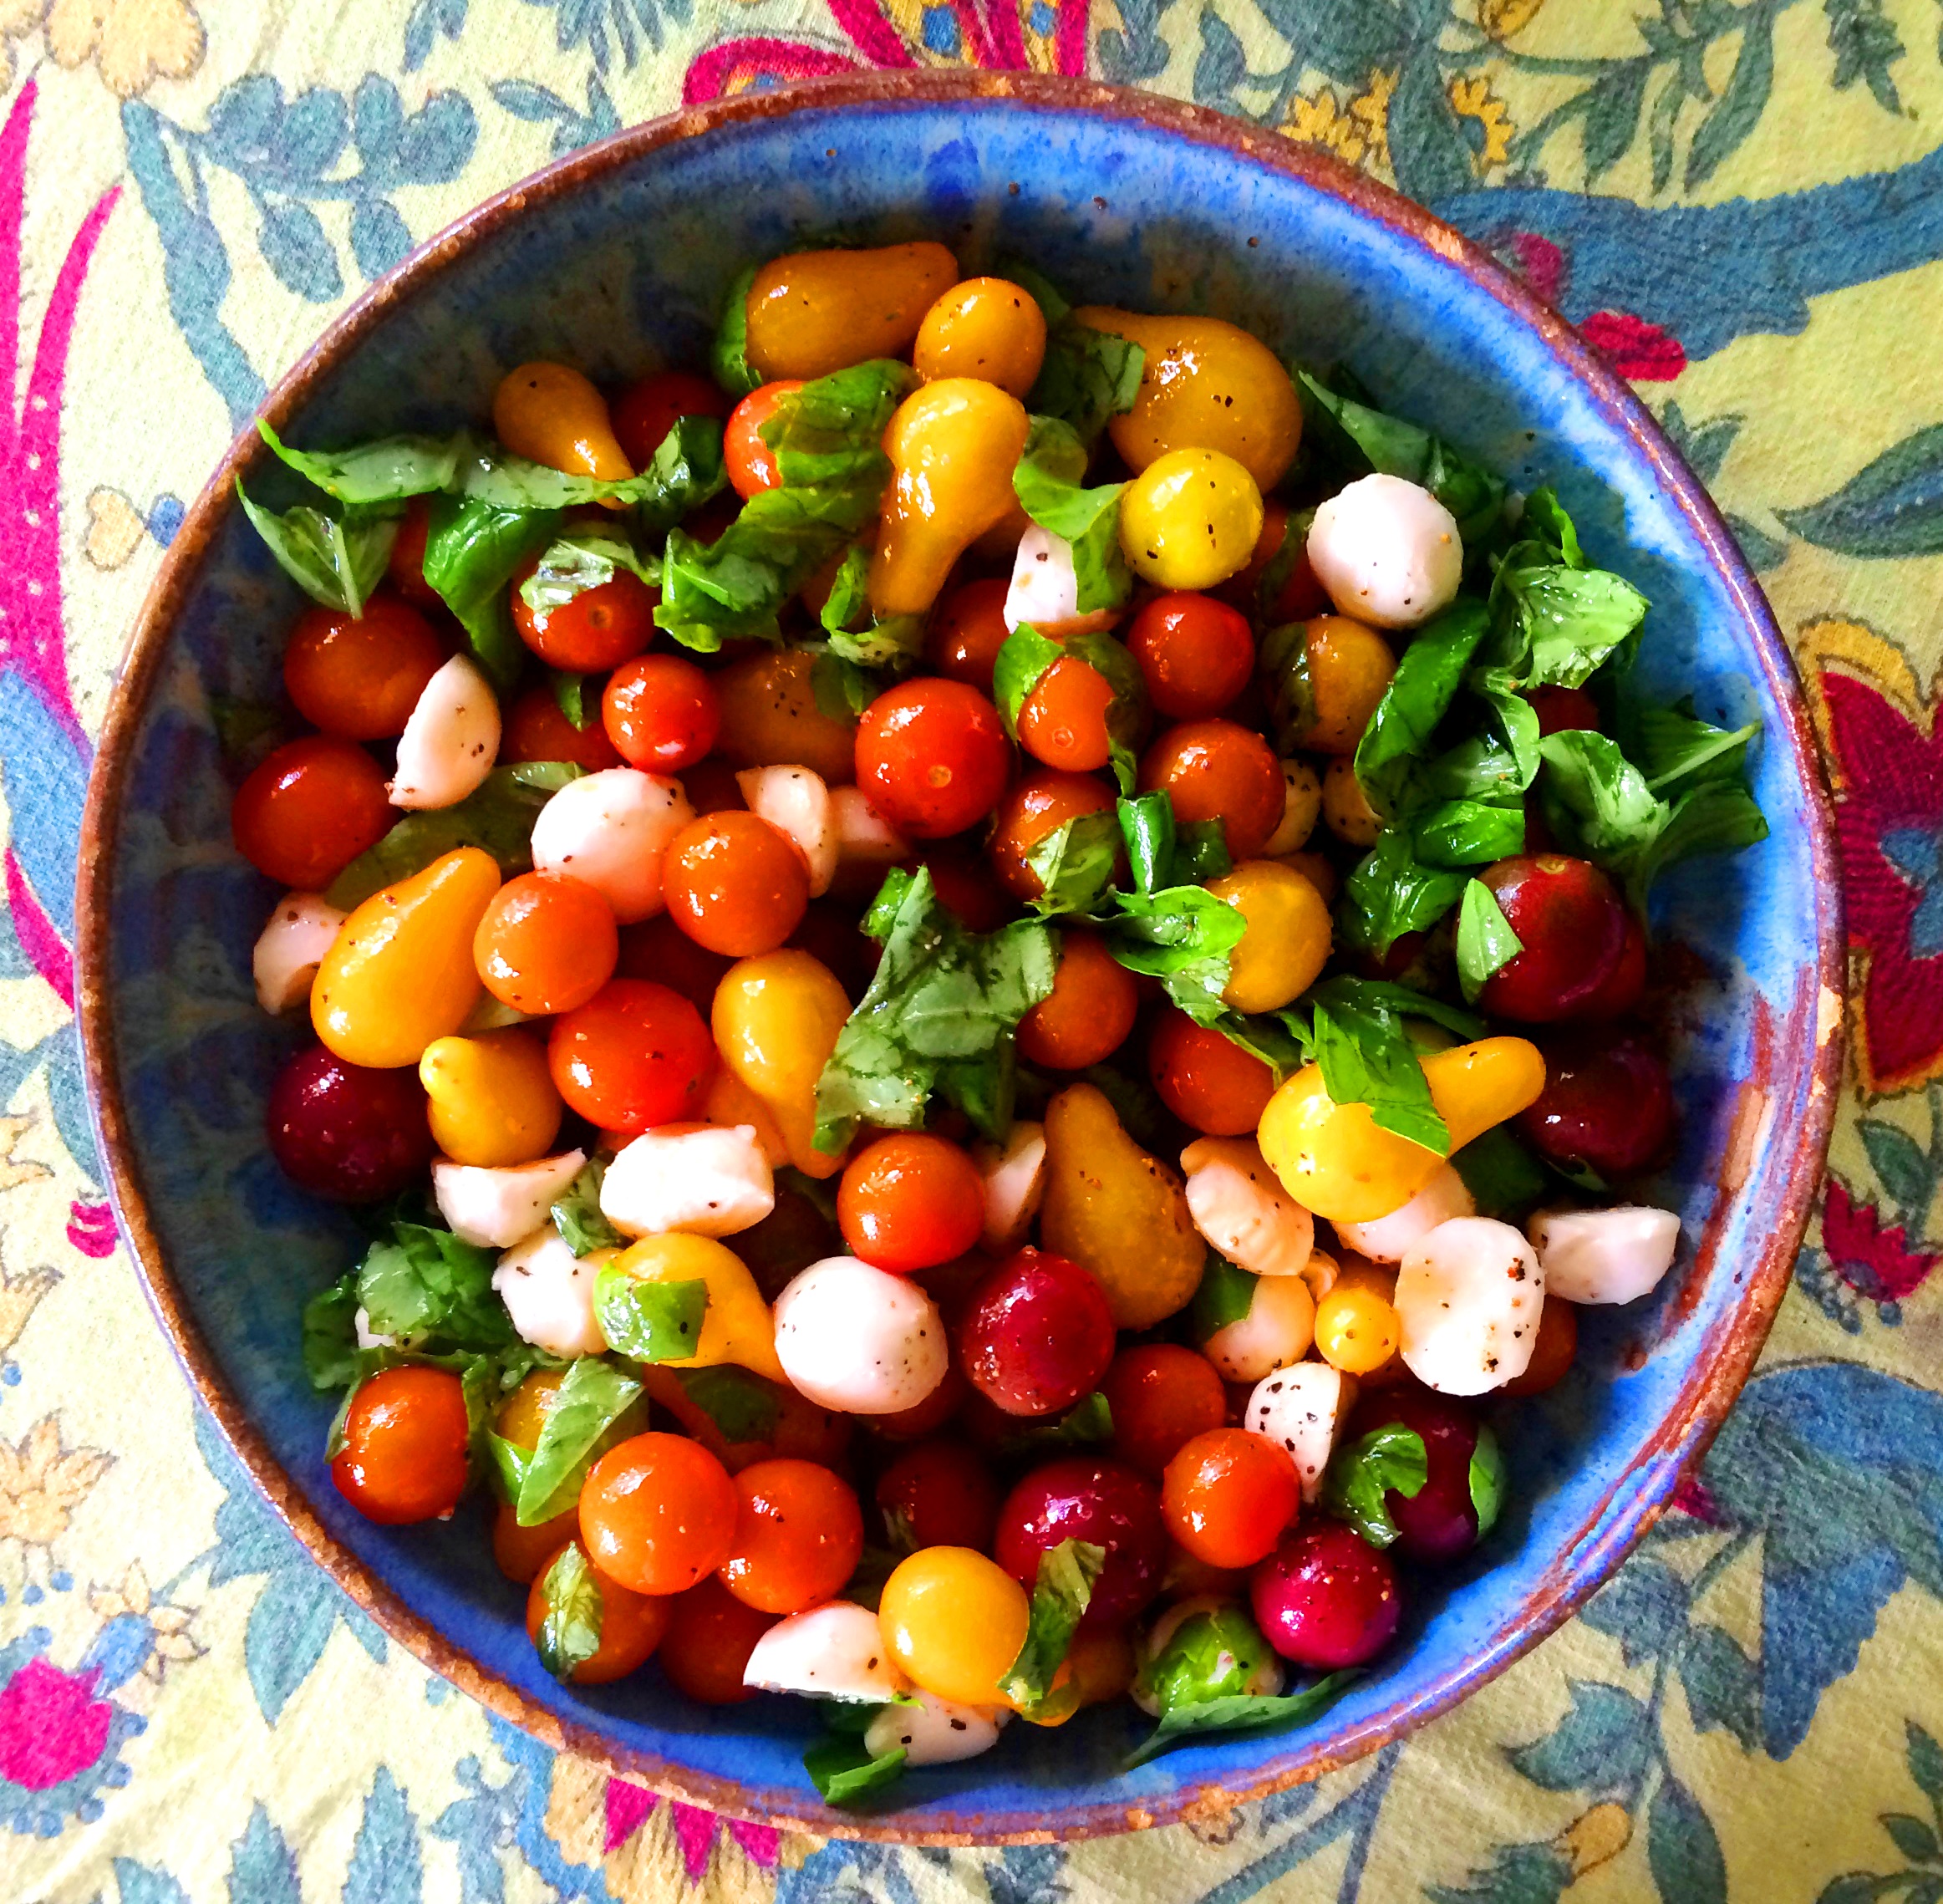
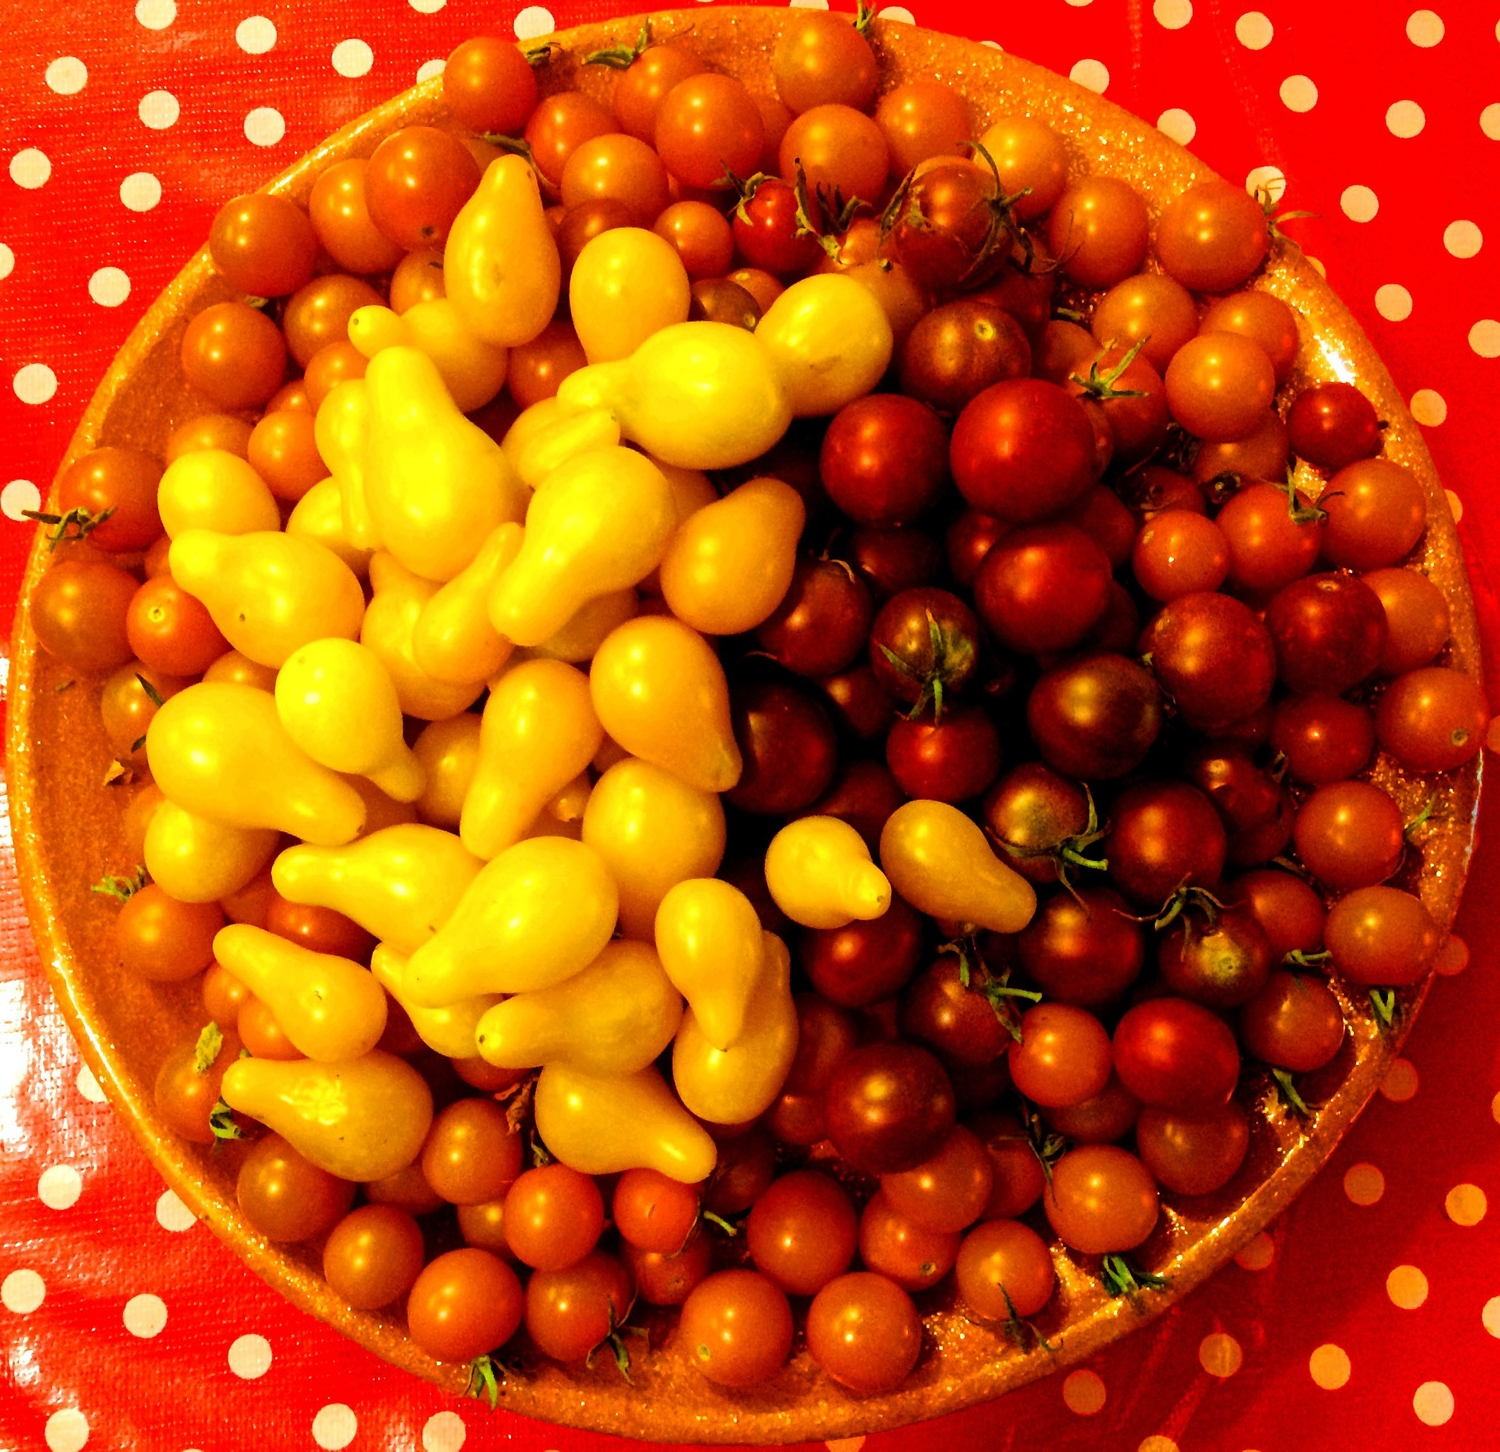
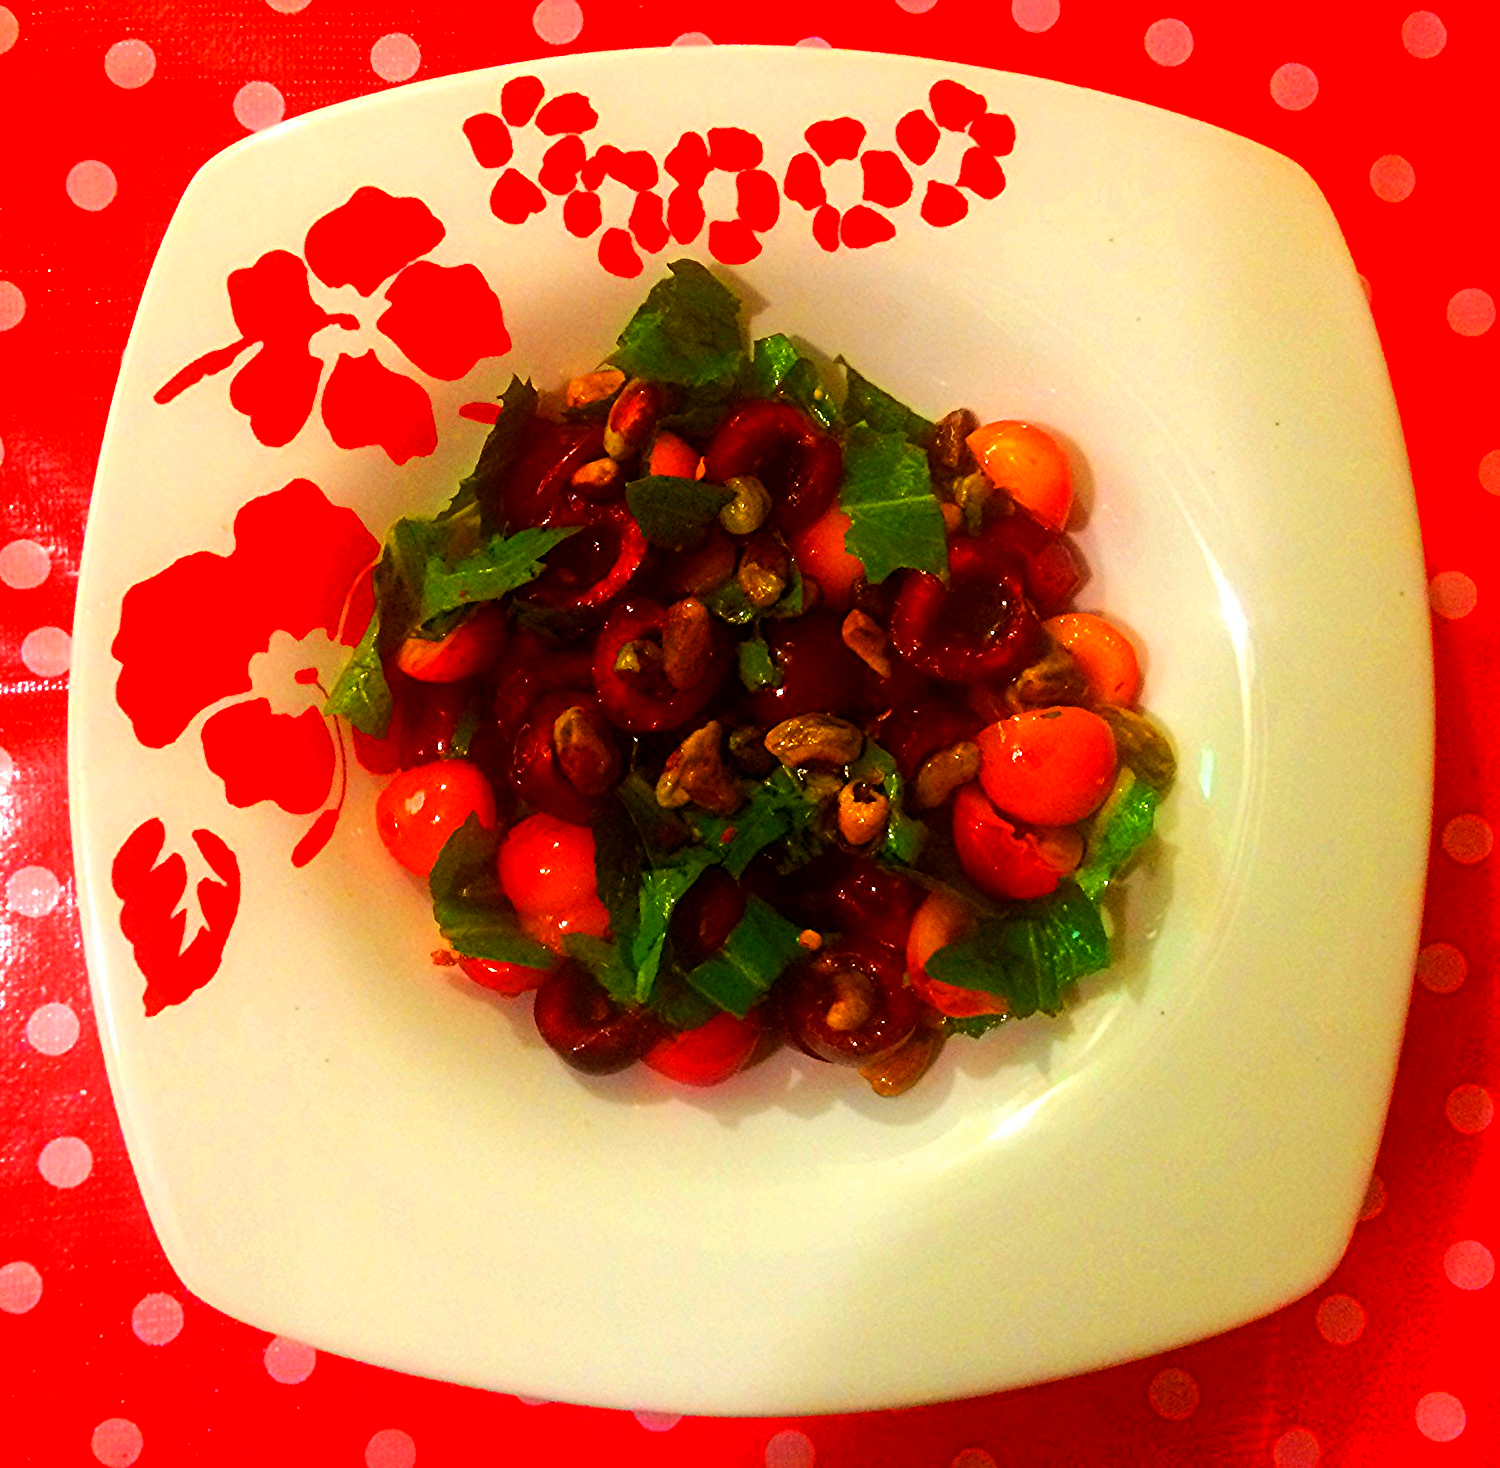
It makes a perfect light meal or a great side dish for an Italian dinner.  I love making this salad for Sunday pasta night with my family!  It has a big wow factor, both in taste and presentation, but takes only five minutes to prepare.  Unlike traditional tomato and mozzarella salads, I go easy on the cheese, using it more as an accent to the tomatoes rather than as a competing flavor.  Feel free to play with the types of tomatoes you use too.  I used more yellow pear, chocolate rose, and sun gold cherry tomatoes here, but the recipe can easily be tweaked to accommodate what you have on hand.

Ingredients:

4 cups cherry tomatoes

8oz small mozzarella balls (one container)

1/2 cup basil

3 tablespoons extra virgin olive oil

3 tablespoons white wine vinegar

salt & pepper to taste

Place washed cherry tomatoes in salad bowl.  Slice mozzarella balls (roughly the size of your cherry tomatoes) in half and add to your bowl.  Shred basil and add to salad, then stir until ingredients are combined.  Drizzle olive oil and vinegar over ingredients and stir until thoroughly mixed.  Add salt and pepper to taste and stir.  Serves 4 as a light meal or 6 as a side dish.  Enjoy!

Enchantment Learning & Living is an inspirational blog celebrating life’s simple pleasures, everyday mysticism, and delectable recipes that are guaranteed to stir the kitchen witch in you. If you enjoyed what you just read and believe that true magic is in the everyday, subscribe to my newsletter below for regular doses of enchantment. Want even more inspiration? Follow me on Instagram, Facebook, Pinterest, and Twitter. Here’s to a magical life!

Comment
Share

Cherry Tomato Summer Salad

IMG_5199.JPG

What is summer without the delight of tomatoes fresh from the vine?  They taste like distilled sunshine and sweet, sweet earth...I could go on forever about these perfect summer jewels which is probably why I end up with piles of these delicious fruits in forms and varieties sitting on my kitchen counter ready to be devoured.  This especially true for cherry tomatoes that are like individually wrapped treats I can pop in my mouth like candy (only better because I don't really like candy, just clean, healthy food). 

One of my favorite ways to enjoy cherry tomatoes is to use them in this easy salad.  It celebrates the perfection of the heirloom cherry tomato with minimal ingredients to weight them down.  Think of it as a bread-less bruschetta.  The only real difference between my salad and a tomato bruschetta topping is the bitter dandelion greens I add to balance out the sweetness of the tomatoes.  Or you can almost think of it as a variation of my spicy cherry salad, minus the spice.

I like to use a variety of cherry tomatoes, here being yellow pear, chocolate rose, and sun gold (pictured below).  It doesn't matter what type of tomatoes--including larger varieties--you use as long as they are super fresh, either from your garden or the farmers market.  Store bought just won't give you the same taste.  Lastly, I keep the dressing light, just enough to coat the ingredients without overshadowing the tomatoes, and rarely use salt in my recipe since these fresh ingredients hardly need to coax out their flavor.  This dish makes a light summer dinner or a perfect side salad.

IMG_5194.JPG

Ingredients:

2 cups heirloom cherry tomatoes

1/2 cup dandelion greens

1/4 cup basil

1 garlic clove

1 tablespoon balsamic vinegar

1 tablespoon extra-virgin olive oil

salt to taste (optional)

Slice the heirloom tomatoes in half and place in a salad bowl.  Shred dandelion greens and basil and add to bowl, stirring until combined.  Mince garlic and add to bowl, stirring until combined.  Drizzle olive oil and vinegar to bowl and mix again.  Add salt of desired. Serves 2. Enjoy!

Enchantment Learning & Living is an inspirational blog celebrating life’s simple pleasures, everyday mysticism, and delectable recipes that are guaranteed to stir the kitchen witch in you. If you enjoyed what you just read and believe that true magic is in the everyday, subscribe to my newsletter below for regular doses of enchantment. Want even more inspiration? Follow me on Instagram, Facebook, Pinterest, and Twitter. Here’s to a magical life!

Comment
Share

On Farmers' Markets

You are a sucker for a good farmers' market, just as you can't resist the temptations of any grocery store.  You go there wanting to be seduced--by ripe heirloom tomatoes,  heaps of ruby radishes, and, if you're really luck, tangled nests of garlic scapes in the spring or juicy peaches near summer's end. 

It is best to go early, before the heat and the crowds bear down on you, before the tender greens and over-ripe fruits begin to wilt and soften under the sun's gaze.  For now, you enjoy the early morning coolness, made all the cooler today from the previous evening's monsoons that raged through the city; the sky is still coated in a blanket of clouds promising more rain.  The city is quiet, subdued.

It is good coffee you must have first in order to browse through the produce stands; it will hold you over until you decide what goods you truly want to commit to.  Its taste is dark and bitter on your tongue--tempting you to balance it out with one of the pastries piled high in several booths like edible artwork topped off with powdered sugar.  But no, you aren't ready to commit yet, not ready to give up the little thrill that blossoms in your belly with each temptation, each possibility.

As you wind your way through the stalls, you marvel at the jewel-like produce: amber carrots, emerald greens, butter yellow corn heads poking through pale green wisps of silk and husk.  You keep your eye out for pickling cucumbers (what is summer without homemade pickles?) and another for those culinary miracles of homegrown tomatoes--gone too soon from the stands--that needs only your teeth sinking into their flesh to make a perfect meal. 

When your coffee has dwindled in its cup and you have made a full circuit around the market, it is time to let yourself be fully seduced by the few items you can't stop thinking about, time to give into the temptation of peppery radishes, red and green okra spears, and tiny heirloom cherry tomatoes.  You return for your treats, already planning the week's meals which all somehow revolve around just washing and eat these earthly treasures raw.  At the last minute, you throw in a bouquet of wildflowers because farmers market flowers always make your nightstand look so lovely, make your mornings so much more delicious when you roll out of bed.

With a full heart and an even fuller canvas bag, you head home, content in your treats, excited to spread them out on your counter in a cornucopia of summer pleasure.

Enchantment Learning & Living is an inspirational blog celebrating life’s simple pleasures, everyday mysticism, and delectable recipes that are guaranteed to stir the kitchen witch in you. If you enjoyed what you just read and believe that true magic is in the everyday, subscribe to my newsletter below for regular doses of enchantment. Want even more inspiration? Follow me on Instagram, Facebook, Pinterest, and Twitter. Here’s to a magical life!

Comment
Share

Zucchini Fritters

This recipe is the perfect solution to an overabundance of zucchini--it's easy, light, and sooooo addictive!  It makes a healthy, quick weeknight meal or a perfect side to a fancier feast come the weekends.  The term "fritter" might be a little misleading, conjuring up images of deep-fried excess.  In reality, these fritters are really more like golden brown cakes or latkes cooked in a little olive oil.

The trick to getting perfectly crisp fritters is to make sure you drain the moisture from the shredded zucchini otherwise you end up with mushy fritters.  To do this, you'll need some cheese cloth which will help you wring the excess moisture out of your zucchini.  You can save the juice for green smoothies.  The second trick to a perfect fritter is in making sure that it is super flat, which in this case means less "batter" to fry up for each cake.  This way you get a crispy outside and moist inside without any mush.

You can serve them over a bed of lettuce and top them with a little Greek yogurt and fresh chives for a dinner that is pure bliss!  They also freeze well, so I like to make a big batch and freeze some of it for a rainy day.

Ingredients:

1 1/2 pounds zucchini (about 2-3 medium zucchinis or 2 1/2 cups), shredded

1/4 cup nutritional yeast

1/4 cup cornmeal

1 egg, beaten

1 garlic clove, minced

1 teaspoon red chile flakes

1 teaspoon sea salt

Place shredded zucchini in a cheesecloth and squeeze out any excess liquid. 

Then place shredded zucchini in a bowl and stir in garlic, chile flakes and salt.  Incorporate nutritional yeast and cornmeal next.  Lastly, add the egg and stir until fully combined.

Heat olive oil on medium heat in a pan. Using your hands, take about 3 tablespoons worth of batter and flatten it into a thin cake.  Place on a skillet and repeat until pan is full.  Let each cake cook for 2-3 minutes per side or until each side is golden brown. 

Serve warm.  Makes about 10 fritters.  Enjoy!

Enchantment Learning & Living is an inspirational blog celebrating life’s simple pleasures, everyday mysticism, and delectable recipes that are guaranteed to stir the kitchen witch in you. If you enjoyed what you just read and believe that true magic is in the everyday, subscribe to my newsletter below for regular doses of enchantment. Want even more inspiration? Follow me on Instagram, Facebook, Pinterest, and Twitter. Here’s to a magical life!

Comment
Share

Small Batch Limoncello

Limoncello to me will always be my first night in Florence, sitting in an outdoor cafe on the Palazzo Vecchio at midnight with my mom and some artist friends drinking this delicious after dinner digestif.  This was my first time ever traveling abroad.  The drink became the embodiment of everything I love about travel: sweet and surprising, with a whisper of that country's everyday routine.  I spent the remainder of my trip in Italy finishing off my nights with this limoncello nightcap, as the Italians do to close out their meal.  The lightness of the lemons acts as a palate cleanser as digestive (where the drink title "digestif" comes from).  Even now, I love to enjoy a bit of limoncello on my patio using my favorite traditional shot-glass sized limoncello cups that I purchased from Capri. 

My mom and I enjoying some limoncello in Florence!

My mom and I enjoying some limoncello in Florence!

Imagine my delight when I found out how easy it is to make this drink!  This liquor is actually made from lemon peels rather than the fruit itself.  They soak in vodka or another clear spirit for anywhere from a week to a month and then the ensuing lemony spirit is mixed with water and sugar.  I let my peels steep for almost three weeks, as the longer you let the steep, the richer the lemony taste of the drink.  The important thing is to make sure that you use organic lemons since you need a chemical free peel to soak in your alcohol base.  This drink is best served chilled, usually after dinner or a big meal.  My family typically enjoys this on Sundays after our pasta feast.  You can also use it as a base for other cocktails--but more on that later. 

I prefer to make this in smaller batches because I like to play with the amount of lemon peels I put in each batch.  Since it is so easy to whip up, these small batches are ideal for this sort of experimentation.  I often use more lemon peels (almost double) than is traditionally called for in this recipe, because I like their brightness more than the sugary taste.  After trying limoncello all over Italy during my stay, I found that this drink ranged from light and crisp (ideal) to super syrupy (yuk!), so I made sure that my recipe stayed on the awesome side of this spectrum.  I also used raw organic sugar, making my final product come out darker than the traditional drink--more like a rich honey hue than a bright lemon yellow--but it still tastes delicious.  Don't discard the lemons after you peel them; save them instead for some homemade lemonade. 

Ingredients:

2 cups good quality vodka

1 3/4 cup water

1 1/4 cup sugar

6 lemons

Remove the peel from your 6 lemons using a vegetable peeler.  Make sure that you are getting the peel only and not the bitter pith. Place peels in a mason jar and pour vodka over them.  Seal jar and let sit for at least two weeks and no more than one month, shaking the jar periodically. 

Freshly peeled lemons with peels soaking in vodka...

Freshly peeled lemons with peels soaking in vodka...

...and same peel & vodka steep three weeks later.  Notice the darker hue that tells you it is ready.

...and same peel & vodka steep three weeks later.  Notice the darker hue that tells you it is ready.

Once the peels have steeped and you are ready to finish your limoncello, strain the alcohol from the peels and discard the peels.  Heat water and sugar in a saucepan on medium-hight until sugar dissolves, about 10 minutes.  Remove from heat and let cool completely.  Add sugar water to your alcohol and stir.  Store in two airtight mason jars and let cool complete in the fridge for at least four hours before drinking.  Lasts for up to one month in the fridge.  Makes about 4 cups of limoncello. Enjoy!

The final product, ready to chill in the fridge!

The final product, ready to chill in the fridge!

Enchantment Learning & Living is an inspirational blog celebrating life’s simple pleasures, everyday mysticism, and delectable recipes that are guaranteed to stir the kitchen witch in you. If you enjoyed what you just read and believe that true magic is in the everyday, subscribe to my newsletter below for regular doses of enchantment. Want even more inspiration? Follow me on Instagram, Facebook, Pinterest, and Twitter. Here’s to a magical life!

Comment
Share

Homemade Ricotta

Freshly made ricotta...it didn't last long after this!

Freshly made ricotta...it didn't last long after this!

Yeah, I went there.  Cheese.  I love the stuff, probably too much.  I love a good cheese board for appetizers (if I'm feeling classy) or dessert (if I'm feeling French), and I will never say no to an aged Gouda or a stinky, soft Taleggio...or really any cheese for that matter.   And if I'm really honest, as much as I like to think up new ways to use cheese in recipes or pair it with other dainty bites, I would rather eat it on its own.  Unless drinking wine with said slab of cheese counts as "pairing" it with something.  So it seemed only natural that I take my relationship with cheese to the next level.  Yes, I decided it was high time I make my own.

Making your own cheese--ricotta, in this case--is surprisingly easy and only takes two real ingredients: whole milk and an acid.  I used lemon juice although many people use vinegar.  If you want to be over the top, you can add salt to bring out the flavor of your cheese more.  In fact, the only real piece of fancy equipment you will need is cheesecloth to help you separate the curds from the whey.  Best of all, you really just spend about five minutes actively working on this--the rest is in the waiting between steps.  Make sure to use organic whole milk because the fat-free versions don't have enough fat and contain weird additives to make the cheese curds stick together.

Once you've made your cheese, you can top with honey and cinnamon for a delicious dessert or let it be the shining of your next cheese platter. When I first attempted this, I used it in homemade gnocchi, so it easily elevates a simple pasta dish and makes you look like a kitchen wizard with very little effort.

Ingredients:

1/2-gallon whole milk

2 lemons, juiced

1 tsp salt

Allow milk to heat in a saucepan on medium-high heat until just about to boil (about ten minutes). While milk is heating, fold a piece of cheese cloth in half so that it makes a finer sieve.  Place a colander in a bigger bowl, then put the layered cheese cloth over the colander.

IMG_5060.JPG

Once milk it hot-to-almost-boiling, remove from heat and add lemon juice, stirring just until the acid is combined with the milk.  You will see it begin to curdle.  Let sit for five minutes.

Then pour your curdled milk over the cheesecloth. 

The whey will drain through the cheesecloth and colander and collect in the bigger bowl.  Let sit for about 20 minutes then lift the cheese cloth away from the colander and squeeze out any remaining liquid.  Makes about two cups of cheese.  Store in fridge for up to five days.

Don't throw the whey out--save it and freeze it using an ice cube tray.  The whey can be added to omelets and smoothies for an extra boost of calcium and protein. 

IMG_5065.JPG

Enchantment Learning & Living is an inspirational blog celebrating life’s simple pleasures, everyday mysticism, and delectable recipes that are guaranteed to stir the kitchen witch in you. If you enjoyed what you just read and believe that true magic is in the everyday, subscribe to my newsletter below for regular doses of enchantment. Want even more inspiration? Follow me on Instagram, Facebook, Pinterest, and Twitter. Here’s to a magical life!

Spicy Cherry Salad

I once again found myself this week with my ever-constant summer dilemma: too much of a good thing, in this case, cherries.  I know life is tough!  But seriously, it's hard to get too worked up when my biggest problem is how to use up all this amazing summer produce that I can't help buying week to week.  The truth is, I'm easily seduced by the mountains of fruits and veggies at the store and farmers market, so I often end up buying seemingly more than I really need for the week.  The big miracle in all of this is that I always end up using all this extra stuff I buy in new recipes (excess produce is great for inspiring kitchen experiments), appetizers for a family get-together, and make-shift lunches (you mean cherries with a spoonful of peanut butter isn't a balanced meal?). 

...but back to my cherry dilemma.  I had both traditional Bing and Rainier cherries on hand and was looking for a way to continue enjoying them after gobbling them up as-is.  I'm not big on sweets, mostly because baking a whole set of cherry muffins or scones or a pie would be too much sugar for me and my family on a day-to-day basis.  So I began to wonder, as I often do, about creating a savory dish out of what we would normally think of as a sweet fruit.  Thus, my spicy cherry salad was born.  It plays on the sweet-tart of the cherries to balance out the bitterness of dandelion greens and the heat of red chile flakes, while the pistachios add a welcome crunch and earthiness.  The lime dressing ties all these flavors together in a perfectly light meal.

Ingredients:

1 cup Rainier cherries, halved and pitted

1 cup Bing cherries, halved and pitted

1/3 cup unsalted pistachios

1/4 cup dandelion greens, shredded

1 teaspoon dried red chile flakes

1/ lime, juiced

2 tablespoons olive oil

salt to taste (optional)

Combine lime juice and olive oil in a mason jar and shake until combined.  Set aside.  In a separate bowl, combine cherries, dandelion greens, chile flakes, pistachio, and salt if desired.  Pour lime dressing over mixture and stir until thoroughly incorporated.  Divide salad between two shallow bowls.  Serves two.  Enjoy!

Enchantment Learning & Living is an inspirational blog celebrating life’s simple pleasures, everyday mysticism, and delectable recipes that are guaranteed to stir the kitchen witch in you. If you enjoyed what you just read and believe that true magic is in the everyday, subscribe to my newsletter below for regular doses of enchantment. Want even more inspiration? Follow me on Instagram, Facebook, Pinterest, and Twitter. Here’s to a magical life!

Comment
Share

Dandelion Pesto

I know what you're thinking: what?!  Dandelion?  Pesto?  The answer is yes. And yes. You know how much I love dandelions...and pesto.  It seems only natural that I would find a way to make them work together.  This riff on the traditional pesto is so packed with healing properties, thanks to the dandelion that is loaded with iron, potassium, magnesium, and vitamins A and C.  It's often used as a natural aid for anemia and is also considered great for all around body detoxification as it acts as a mild laxative and, if the roots are also used, a liver cleanser.  Basically, this humble little weeds helps us clean out toxins from our body (and herbal mystics say our mind) so we can live healthier lives.  Wow!  This is why I am so in love with this herb and often use it in many of my tea blends like my Warrior Tea, meant to replenish the body after a hard workout.

Like my basil pesto, this pesto swaps out the traditional Parmesan cheese for nutritional yeast.  I reduce the amount of olive in this recipe to compensate for the addition of lemon juice, here used to counteract the bitterness of the greens.  I sometimes swap out the sunflower seeds for pepitas or pumpkin seeds with equally tasty results.  As always, I don't really add much, if any, salt to this as the yeast and lemon provide enough seasoning for me, but you can always add salt if you want.  This pesto is great smeared on sandwiches (in place of mayo), crostini, pizza, or pasta, and makes a great base for a salad dressing.

Ingredients:

2 cups organic dandelion greens (one bunch)

1 clove garlic

1 tbsp lemon juice

1/3 cup sunflower seeds

1/2 cup extra-virgin olive oil

1/2 cup nutritional yeast

Salt to taste (optional)

Blend all ingredients in a blend or food processor until combined.  Store in a mason jar in the fridge for up to one week (though I doubt it will last that long, it's so good!).  Enjoy!

Enchantment Learning & Living is an inspirational blog celebrating life’s simple pleasures, everyday mysticism, and delectable recipes that are guaranteed to stir the kitchen witch in you. If you enjoyed what you just read and believe that true magic is in the everyday, subscribe to my newsletter below for regular doses of enchantment. Want even more inspiration? Follow me on Instagram, Facebook, Pinterest, and Twitter. Here’s to a magical life!

Comment
Share

Stuffed Avocado Salad

So by stuffed avocado, I mean stuffed-to-over-flowing. Yum!  Personally, I think avocados are perfect in their creaminess and good-for-you-fats.  My family can't get enough of them!  I especially enjoy them as the focal point of a light meal during the summer.  It takes this fruit (yes, fruit!) out of its guacamole rut and elevates it into something more divine.  It also helps with portion control, as you can shape your meal around what an avocado can fit into the hollowed out core.  Another way to think of this is like a fancier version of my Mason Jar Southwest Salad.

You can almost see the avocado under there...

You can almost see the avocado under there...

Take, for example, this stuffed avocado recipe which features avocado halves piled high with corn, black beans, jalapenos...all the good stuff.  It has all the spicy elements of a good taco without the heaviness of too much meat or corn tortillas fried in oil.  Plus, as per my own cooking criteria, it's super easy to whip up.  The recipe only calls for a little bit of corn and black beans, you'll notice.  You can use frozen corn for this and, if you use a can of black beans, you can freeze the remainder in ice cube trays so you have tablespoon sized portions ready for the next time you make this recipe.  Personally, I don't really use much salt, if any, in this recipe, as the lime dressing pops out the flavors without the need for additional seasoning.

Ingredients:

2 cups mixed greens

1 avocado, halved, skinned, seed removed

1/4 cup cherry tomatoes, sliced in 4ths

2 tablespoons sweet corn

2 tablespoons black beans

1/2 to a whole jalapeno, diced (depending on how hot you like it)

1 spring onion, diced

2 limes, juiced

2 tablespoons olive oil

Salt to taste

Evenly divide the lettuce between two plates or shallow bowls.  Place each avocado halves in your lettuce nests and set aside.  In a separate bowl, combine tomatoes, corn, beans, jalapenos, onion, and, if desired, salt. Evenly divide the filling between your plates, making sure to get as much of the filling into the hole left by the avocado seed before letting it spill out over the lettuce.  Then combine lime juice and olive oil in a mason jar and shake vigorously until combined.  Evenly divide the dressing between two dishes.  Serves two.  Pairs well with a Watermelon Cooler.  Enjoy! 

Enchantment Learning & Living is an inspirational blog celebrating life’s simple pleasures, everyday mysticism, and delectable recipes that are guaranteed to stir the kitchen witch in you. If you enjoyed what you just read and believe that true magic is in the everyday, subscribe to my newsletter below for regular doses of enchantment. Want even more inspiration? Follow me on Instagram, Facebook, Pinterest, and Twitter. Here’s to a magical life!

Italian Grilled Veggies

One of my absolute favorite dishes, when I traveled through Italy last summer, was grilled vegetables.  I know what you're thinking: not pasta?  Not pizza?  Not better-than-ice-cream gelato? Yes, I loved those too--and I would be lying if I said I didn't enjoy them every second I could!  But these Italian grilled vegetables were such a nice break from carbs.  My mom and I would often split a plate of grilled veggies and a salad or pasta for lunch--pure heaven!  What makes this dish so good is that it is light and tasty, using only the bare minimum of ingredients and super fresh produce.  Every place had its own take on the dish, too.  Some used bell peppers and onions with the eggplant, while others kept it more zucchini based, while still others loaded on the garlic and basil.  In all cases, it was a divine dish, so much so that I found myself craving it when I got back home. 

Naturally, this led to kitchen experiments.  It didn't take much to get it right: just some organic veggies (usually from my local farmers' market), extra virgin olive oil, and balsamic vinegar.  Oh yes, it was amazing!  It's also super easy, just the way I like my recipes.  Feel free to play around with the types of veggies and keep in mind that the longer they marinate, the tastier this dish will be.

Grilled veggies ready for the table, yum!

Grilled veggies ready for the table, yum!

Ingredients:

1 medium eggplant

2 medium zucchinis

2 medium yellow squashes

1 cup extra virgin olive oil (approximately)

1 cup balsamic vinegar (approximately, I used white balsamic vinegar in these photos)

Salt to taste

Pepper to taste

Drizzle about a tablespoon of olive oil onto the bottom inside of a shallow baking dish.  Thinly slice all the vegetables.  Line the baking dish with the yellow squash until the bottom is more or less covered.  Drizzle another tablespoon of olive oil across this layer and about a tablespoon of vinegar.  Dust the top with a little salt and pepper.

Layer one in glass baking dish.

Layer one in glass baking dish.

Then layer the zucchini on top of that, making sure to then drizzle it with oil, vinegar, and seasoning.  Do the same with the eggplant and repeat, alternating veggies, until all the veggies are layered on and the dish is full.  Pour on any remaining olive oil and vinegar.  Cover and let sit for at least one hour. It can be stored overnight in the fridge as well.  If you do store it in the fridge, be sure to take it at and get to room temp before grilling.

Layer two...you get the idea.

Layer two...you get the idea.

Once the vegetables have marinated, fire up your grill (or grill skillet on your stove) until it is medium hot.  Drizzle surface with olive oil if using a grill skillet or brush more olive oil on your veggies before placing them on your outdoor grill.  Cook each side until it has grill marks, about 1-2 minutes per side.  It may take two or more batches to grill all the veggies, depending on how big your grill is. 

Veggies on the grill.

Veggies on the grill.

Once your veggies are ready, you can place them back in your baking dish for serving.  If you have another round of veggies to grill, you can put your baking dish in the oven on low (250) to keep your cooked veggies warm.  Serve these on their own as a light meal, or as a side to pasta or salad.  They also make a great veggie sandwich the next day.  Serve approximately 4-6.  Enjoy!

Enchantment Learning & Living is an inspirational blog celebrating life’s simple pleasures, everyday mysticism, and delectable recipes that are guaranteed to stir the kitchen witch in you. If you enjoyed what you just read and believe that true magic is in the everyday, subscribe to my newsletter below for regular doses of enchantment. Want even more inspiration? Follow me on Instagram, Facebook, Pinterest, and Twitter. Here’s to a magical life!

Comment
Share

On S'mores

They are the perfect July dessert: messy, unfussy, reminiscent of childhood summers where you lost track of time playing in the backyard all day and staying up late giggling with your sisters in makeshift tents.

True, they are nothing but graham crackers and chocolate and marshmallows, certainly not the sophisticated flavors of lemon and almond that you favor now.  Still, you have found that at least once a summer you must have this delectable treat.  It must be enjoyed after a big cookout, once the chile burgers and watermelon and sweet potato fries have been devoured.  After the dinner dishes have been cleared and cleaned and your family has had time to lounge on the grass, the sun setting in the distance, bringing a welcome coolness to your native desert.

Only then are you ready for the summer ritual of s'mores.

You have a system down: the perfect number of marshmallows to put on your stick (two). The ideal place on the grill to roast them (above the biggest flame so that it toasts your marshmallows into gooey perfection). And the exact moment to remove them from the heat and sandwich them between cracker and chocolate (right as the marshmallows turn golden brown and are in danger of sliding off your stick).  Then you pause, wait a moment for the hot marshmallow to melt your chocolate and bind your sandwich into messy heaven.  Yes, you perfected this system long ago.

You take a bite.  Marshmallows spill out of your sandwich and chocolate dribbles on your fingers.  This is no dessert for a lady nor a mannered dinner guest.  It is a dessert of summer abandonment, eaten over the grill or in the grass with nothing but sticky fingers and chocolate on your chin to show for it when it's gone--that, and a happy heart, full from a day of pure summer enjoyment.

Enchantment Learning & Living is an inspirational blog celebrating life’s simple pleasures, everyday mysticism, and delectable recipes that are guaranteed to stir the kitchen witch in you. If you enjoyed what you just read and believe that true magic is in the everyday, subscribe to my newsletter below for regular doses of enchantment. Want even more inspiration? Follow me on Instagram, Facebook, Pinterest, and Twitter. Here’s to a magical life!

Comment
Share

Easy Homemade Pickles

IMG_5030.JPG

According to my dad, a sandwich isn't complete until it has a pickle spear by its side.  My rule of thumb? A pickle isn't a pickle unless it's homemade.  The stuff you get in stores is usually so packed with salt, artificial flavors, colors, and preservatives that you completely lose the beauty of a good pickle: crisp, tart from the vinegar, and tasting faintly of the cucumber that it came from.  Between me and my dad's pickle philosophies, you've got yourself a perfect recipe to enjoy this summer. 

Best of all, making your own pickles is super easy--it takes only 20 minutes!  I like to use fresh pickling cucumbers (the small cucumbers that look like pickles) from my local farmers' market, but any cucumber will do.  You can pickle them whole, slice them into spears (which I do for my dad), or slice them into little medallions like you do to quick-pickle some veggies.  Just keep in mind that the bigger the cucumber, the longer it needs to soak in your brine to get pickled--about one week to ten days for whole pickles, to two hours for quick pickle slices.  Of course the longer any of them soak in the brine, the tastier they are!

IMG_5031.JPG

Ingredients:

6-8 small pickling cucumbers

2 cloves garlic

1 cup white vinegar

1 cup water

2 tablespoons dill seed

1 teaspoon cumin

1 teaspoon hot pepper flakes

1 teaspoon sea salt


You'll need two mason jars for canning.  Place one peeled whole garlic clove in each jar.  Slice the cucumbers how you want them (or keep them whole).  For this recipe, I did one jar of spears and one jar of medallions.  Place cucumbers in jars.

Place vinegar, water, salt, and spices in a saucepan and heat on medium until boiling.  Remove from heat and let cool for ten minutes.  Then, while brine is not completely cooled, pour mixture over cucumbers in jar and allow to cool completely before storing them in the fridge.  Serve alongside (or in) sandwiches or even as a quick salad topper.  Keep for up to two weeks in the fridge (although mine never last that long).  Enjoy!

Enchantment Learning & Living is an inspirational blog celebrating life’s simple pleasures, everyday mysticism, and delectable recipes that are guaranteed to stir the kitchen witch in you. If you enjoyed what you just read and believe that true magic is in the everyday, subscribe to my newsletter below for regular doses of enchantment. Want even more inspiration? Follow me on Instagram, Facebook, Pinterest, and Twitter. Here’s to a magical life!

Quick-Pickled Veggies

Confession: I am a pickle addict.  Given my own way, I'd pickle anything...and that's not even getting into my current obsession with a good dirty martini made with my homemade pickling juice.  So naturally, I always like to have a jar of quick pickled veggies on hand.  They are healthier than the store bought varieties (read: less salt and other additives), you can choose your own seasonings, and they are a great way to spice up anything from a simple sandwich to an impromptu salad.  They even make a great appetizer on their own or with a little aged Gouda. Yum! 

Feel free to experiment with the veggies and spices you have on hand.  I've done this with just beets when I had too many on hand and swapped out the coriander with dill seed (or put in both!).  Or if you don't have apple cider vinegar on hand, swap it out with white vinegar.  Make sure to get organic veggies, too--you don't want the pesticides of non-organic veggies soaking in your brine.  Your local farmers market is a good place to get the ingredients.

Ingredients:

1 cup apple cider vinegar

1 cup water

1 yellow onion

6-8 radishes

1 cucumber

2 carrots

2 garlic cloves

1 teaspoon considerate seeds

1 teaspoon red chile flakes

1 teaspoon sea salt

Thinly slice all veggies and mix them up in a large bowl.  In a small saucepan, bring vinegar, water, spices, and salt to a boil (about 10 minutes on medium heat).  Remove saucepan from heat and let liquids cool for about 10 minutes.  While the liquids are still warm, pour over sliced veggies. Let sit until completely cooled then divide the veggies and brine equally into 2+ mason jars.  Store in fridge.  These pickles will be ready to eat in two hours but can last up to two weeks in the fridge.  Enjoy!

Enchantment Learning & Living is an inspirational blog celebrating life’s simple pleasures, everyday mysticism, and delectable recipes that are guaranteed to stir the kitchen witch in you. If you enjoyed what you just read and believe that true magic is in the everyday, subscribe to my newsletter below for regular doses of enchantment. Want even more inspiration? Follow me on Instagram, Facebook, Pinterest, and Twitter. Here’s to a magical life!

Quick Apricot-Basil Jam

Sometimes an afternoon calls for jam on toast--with a cup of tea, of course!  I love jam, but too often find that the store-bought kind loses the flavor of the fruit with too much sugar.  What's the point of enjoying an apricot jam, for example, if it tastes more like corn syrup than those perfectly tart stone fruits?  Naturally, faced with this dilemma (and another heap of apricots I wasn't sure how to finish), I set about figuring out how to make my own jam.  I had two caveats: it must taste like the real fruit (so minimal sugar) and it must be easy (the thought of canning, standing over a boiling pot of water sterilizing jam jars felt like too much work in this summer heat).

After searching the interwebs, I found my inspiration in a Blackberry Chia Seed Jam recipe from Two Peas and Their Pod and a How to Make Chia Seed Jam tutorial from Oh My Veggies.  The reoccurring theme?  Chia seeds!  They replace the pectin that helps the jam gel.  These little orbs turn translucent and gummy when exposed to heat, giving them a texture similar to tapioca as you might remember from my Easy Vanilla Cinnamon Chia Seed Pudding recipe.  I also threw in a handful of basil because I love the combination of tart fruit and earthy herbs.  What's great about this recipe is that it is so versatile that you play around with your favorite fruit and herb combinations. 

Ingredients:

2 cups diced apricots

1/4 cup chopped basil

1 organic lemon, juiced

2-3 tbsp honey (depending on how sweet you like your jam)

2 tbsp chia seeds

1 tsp vanilla extract

Combine fruit, lemon juice, vanilla extract, and honey in a saucepan and cook on medium until fruit begins to break down, about 10 minutes.  Reduce heat and stir in basil. Cook for two more minutes.  Remove from heat and stir in chia seeds.  Allow to cool completely.  Store in a mason jar for up to two weeks.  Serve on toast, as a compote with age cheddar, or over your morning oatmeal. Enjoy!

Enchantment Learning & Living is an inspirational blog celebrating life’s simple pleasures, everyday mysticism, and delectable recipes that are guaranteed to stir the kitchen witch in you. If you enjoyed what you just read and believe that true magic is in the everyday, subscribe to my newsletter below for regular doses of enchantment. Want even more inspiration? Follow me on Instagram, Facebook, Pinterest, and Twitter. Here’s to a magical life!

Comment
Share

On Attempting to Make Veggie Sushi

IMG_4987.JPG

You awoke that morning with the lofty goal of making your own sushi.  It would be veggie sushi with some of that chile-crusted tofu you needed to finish.  And no rice.  Rice is overrated. You would get the supplies today and figure out how to make that perfect little meal at home--cool, refreshing, healthy, just what your body wants during the hot days of summer.

It would be so simple; you'd watched plenty of youtube videos and looked up countless recipes for a good rice-less sushi roll on Pinterest (because really, isn't a good sushi roll all about the fresh slice of avocado, the crisp bite of carrots, the heat of wasabi invading your nose?).

So you got your bamboo sushi mat and even some chopsticks.  You roasted some edamame for an appetizer and even mixed a bowl of soy sauce and wasabi for your roll.  You prepped your vegetables, thinly slicing avocado, radishes, carrots, and then did the same to your spicy tofu.  Now there was nothing left to do but assemble your sushi roll.  Gently, you placed a crispy seaweed square onto your bamboo mat. You laid out your fillings atop that, careful to leave room around the edges of the seaweed for easier rolling--a tip you picked up from those how-to videos. 

You began to roll your creation; soon it was a tangle of loose carrot strands and tofu that wouldn't quite stay in place, little cracks on the seaweed as you attempted to make a tighter roll.  It was all you could do to finish the process, wrapping that one naked strip of seaweed around your creation, sealing it with water--afraid to let go, lest your grip was the only thing keeping your roll more-or-less together. 

There it sits, your first attempt at making sushi.  It is not particularly lovely, nor the graceful tight roll you had envisioned that morning.  But it is yours.  You made it.  You tried something new.  So with the happy resolve of someone determined to master this new kitchen project--already taking notes on how to better make sushi next time--you slice your roll, not caring that carrots stick out at each end or that the filling doesn't quite want to stay in.  It is delicious in its messiness, perfect in its embodiment your fearless kitchen experiments, your constant thirst for new ways of experiencing nourishment.   

Enchantment Learning & Living is an inspirational blog celebrating life’s simple pleasures, everyday mysticism, and delectable recipes that are guaranteed to stir the kitchen witch in you. If you enjoyed what you just read and believe that true magic is in the everyday, subscribe to my newsletter below for regular doses of enchantment. Want even more inspiration? Follow me on Instagram, Facebook, Pinterest, and Twitter. Here’s to a magical life!

Comment
Share

Chickpea & Mushroom Salad

Come summertime, all I want to eat is salad.  And fruit.  And basically anything that is light and super easy to fix so I can spend more time outside hunting for ladybugs and collecting daisies...or something along those lines.  Which brings me to this delicious, simple dinner that can be made at the drop of a hat--especially for those nights when you aren't sure what to make.  The kicker with this recipe is that it's actually a warm salad--a nice break for your system, which can have a hard time digesting raw veggies all the time.  I adapted this recipe from Celia Brooks Brown's New Vegetarian cookbook when I found myself one night with too many chickpeas and not enough creative inspiration for dinner.  It was then my Chickpea & Mushroom Salad was born.  I added in turmeric, chives, and other little ingredients to provide extra nutrition and flavor, and swapped out the called-for spinach for mixed-greens (mostly because that was what I had one hand).  The yogurt mint and chive dressing provides the perfect tangy balance to the cumin and turmeric cooked mushrooms and chickpeas.  Now this recipe is one of my go-to weeknight dinners!

Ingredients:

16 ounces cooked chickpeas (1 can, drained and rinsed, or one cup cooked)

12 ounces button mushrooms

1 small sweet onion, diced

3 tablespoons olive oil, plus more for sautéing mushrooms and chickpeas

2 cloves garlic, diced

1teaspoon chile seeds

2 teaspoons cumin

2 teaspoons turmeric

3 tablespoons lemon juice (about 2 lemons)

3/4 cups plain yogurt

2 tablespoons fresh mint, chopped

2 tablespoons fresh chives, chopped

5 cups mixed greens

Salt to taste

Heat oil in pan.  Cut mushrooms in half and add them to the pan and cook until soft.  Reduce heat and add diced onion and garlic and cook for 2 more minutes or until onions turn translucent.  Then add chickpeas, cumin, turmeric, chile seeds, and salt to taste.  Sauté for 1 minute then add 1 tablespoon lemon juice and let mixture simmer on low while you prepare the salad dressing.

For the salad dressing, mix together yogurt, olive oil and remaining lemon juice until combined.  Mix in chives and mint, then salt to taste.  Divide mixed greens between 4 plates, then add the chickpeas and mushrooms on top of the lettuce.  Finally, pour yogurt dressing over the mushrooms and chickpeas.  Serves 4.  Enjoy!

Enchantment Learning & Living is an inspirational blog celebrating life’s simple pleasures, everyday mysticism, and delectable recipes that are guaranteed to stir the kitchen witch in you. If you enjoyed what you just read and believe that true magic is in the everyday, subscribe to my newsletter below for regular doses of enchantment. Want even more inspiration? Follow me on Instagram, Facebook, Pinterest, and Twitter. Here’s to a magical life!

Comment
Share

Watermelon Cooler

Watermelon cooler (here made with basil, lemon, and lime) ready for an evening on the porch!

Watermelon cooler (here made with basil, lemon, and lime) ready for an evening on the porch!

When the sizzling temperatures of summer hit, I find myself craving watermelon juice.  Perhaps it is because of the great memories I have of drinking this delicately refreshing drink after many a hot yoga practice or because I always find myself with an extra watermelon in my fridge, but in either case, I find this watermelon cooler a go-to drink for the summer.  As I've gotten used to "juicing" watermelon, I've played around with this cooler, adding fresh lime juice to compliment the sweetness of the melon and even herbs, like basil or mint, to give the drink an extra kick.  This drink is great for overripe melons; while their texture might be grainy and less-than-appetizing, their juices are still plenty sweet and delicious.  This recipe also makes a great mocktail (or virgin cocktail) for those times you want a festive, hydrating drink.  If you want to make a full-fledged cocktail out of it (as I've been known to do come Friday night), you can simply add a shot of vodka to your drink.  Don't have limes on hand?  Swap them out with lemons.  It's pretty versatile!

Ingredients:

1 medium sized watermelon, the flesh scooped out, rinds discarded (about 4 cups)

3 limes, juiced (about 2-3 tablespoons)

3 tablespoons basil simple syrup (optional)

To make basil simple syrup, simply follow the instructions in my ginger simple syrup recipe, making sure to swap out the ginger with two cups of fresh basil leaves. 

Freshly pureed watermelon being poured into pitcher via a sieve.

Freshly pureed watermelon being poured into pitcher via a sieve.

Blend watermelon chunks in batches in a blender on medium speed until pureed.  Then pour pureed watermelon into a pitcher, using a sieve to separate the pulp from the juice.  Once all the juice is in the pitcher, stir in lime juice and taste.  If you want more of a lime taste, you can juice and add more.  Then, if you would like, add the basil simple syrup.  Enjoy!  Makes about 4 servings.


Enchantment Learning & Living is an inspirational blog celebrating life’s simple pleasures, everyday mysticism, and delectable recipes that are guaranteed to stir the kitchen witch in you. If you enjoyed what you just read and believe that true magic is in the everyday, subscribe to my newsletter below for regular doses of enchantment. Want even more inspiration? Follow me on Instagram, Facebook, Pinterest, and Twitter. Here’s to a magical life!

Comment
Share

Breakfast Granola

Mmmmm...looks like the perfect breakfast to me: granola topped with Greek yogurt and fresh raspberries. 

Mmmmm...looks like the perfect breakfast to me: granola topped with Greek yogurt and fresh raspberries. 

If you've never made homemade granola before, you are in for a treat.  The smell of cinnamon and toasting nuts emanating from the oven is as intoxicating as any baked good perfuming your home.  And there is nothing better in the summer than homemade granola topped with Greek yogurt and fresh fruit for breakfast.  It's fast, it's filling, and it's sooooo delicious!  My mom first got me into granola after she and my dad had the amazing homemade stuff at a B&B in Canada.  They brought home the recipe book, and we immediately set to making our own. 

Now I usually use what I have on hand in the kitchen to make granola--whatever nuts, spices, and grains stuck in the back of my pantry.  The recipe is versatile and forgiving--my kind of recipe!  You can easily swap out ingredients for others and play around with different flavors (vanilla extract this time, loads of ginger the next).  One of the other great perks of making your own granola is that you can control the sugar content.  Most store-bought granola has way more sugar and salt than is healthy for you.  By making your own, you can get the benefits of this nutrient-dense breakfast without sugar or salt overload. 

Ingredients:

4 cups multi-grain oats

1 cup sunflower seeds

1 cup pepitas (pumpkin seeds)

1 cup almonds

1/2 cup flax seed meal

1/2 cup chia seeds

1 tsp cinnamon

1 tsp vanilla extract

3/4 cup honey

1 cup olive oil

Preheat oven to 325 degrees.  Mix all dry ingredients together in a large bowl, then slowly add oil, honey, and vanilla extract until they fully coat the dry ingredients. 

Spread out mix evenly on a large baking sheet (you will have to work in batches).  Make sure that you don't overload the pan, or it will cook unevenly.  Baking until toasted, about 20 minutes. 

Raw granola mixture ready for the oven.

Raw granola mixture ready for the oven.

Stir once halfway through.  Remove from oven and let cool.  Store in an airtight container for 2-4 weeks.  Makes around 15 servings.  Serve with berries and yogurt for breakfast or on its own as a light afternoon snack.  Enjoy!

Granola fresh from the oven, cooled, and ready for pantry storage.

Granola fresh from the oven, cooled, and ready for pantry storage.

Enchantment Learning & Living is an inspirational blog celebrating life’s simple pleasures, everyday mysticism, and delectable recipes that are guaranteed to stir the kitchen witch in you. If you enjoyed what you just read and believe that true magic is in the everyday, subscribe to my newsletter below for regular doses of enchantment. Want even more inspiration? Follow me on Instagram, Facebook, Pinterest, and Twitter. Here’s to a magical life!

On Tasting the First Tomatoes from Your Garden

There they are.  Two small cherry tomatoes ripening on your potted tomato plant.  Sometime between when you left for your short trip and your return, those little globes went from green peas to ripe red fruit.  You stare at them for a long time, not quite believing your luck.  Two whole tomatoes, there for your enjoyment. 

Then, barefoot and holding your watering can in one hand and dead plant leaves in the other, you consider your options.  You are hesitant to eat them all at once but can't think of any recipe that would call for just two cherry tomatoes.  Even worse, you would hate for them to get lost in a salad, where the lettuce, vinegar, and oil might overwhelm them completely.  As you weigh your options, you know you've already made up your mind: you lack the self-control to do anything but eat them straight from the vine.  You set your watering can down and toss out your weeds and debris--the rest can wait.

As you pick those little tomatoes, you can feel their sun-warmed skins, the smooth, soft flesh wrapped tautly around their juicy core.  You take the first one in your mouth, allowing it to roll around your tongue, almost afraid to break the surface of its skin with your teeth--but you do it anyway.  You can't resist the taste of a real tomato. 

You feel the skin break, spilling out soft seeds and flooding your mouth with the sweet taste of summer: sun, soil, savory red fruit.  You are left with the tart taste on your lips and soil on your hands.  It is over too fast; you promise to make the second one last longer but you know it, too, will be gone sooner than you would like.  Already your tongue is missing the bright taste of this homegrown magic.

You pop the last one into your mouth determined to savor every last inch of it. You roll it around your tongue remembering why your garden tomatoes have turned you against their mealy store bought cousins. Then this second one, too, is gone in a flood of seeds and juice.  You gaze longing at your tomato plants, searching for signs of yellow flowers or little green bulbs that will one day ripen into edible euphoria. Until then you can only wait, water, tend.  So you pick up your watering can once more and go about the business of tending your garden, the tang of the first tomatoes of the season still fresh on your lips.

Enchantment Learning & Living is an inspirational blog celebrating life’s simple pleasures, everyday mysticism, and delectable recipes that are guaranteed to stir the kitchen witch in you. If you enjoyed what you just read and believe that true magic is in the everyday, subscribe to my newsletter below for regular doses of enchantment. Want even more inspiration? Follow me on Instagram, Facebook, Pinterest, and Twitter. Here’s to a magical life!

Comment
Share

Basil-Nutritional Yeast Pesto

Fresh basil from the garden.

Fresh basil from the garden.

I love basil--and pesto.  I literally cannot live without either of these culinary miracles, especially in the summer when the basil is plentiful and it is so easy to whip up a batch of this flavor enhancing sauce.  I like to make a big batch of it and freeze it in little ice cube trays.  When I need a little something extra for pizza, salad dressing, or pasta sauce, I just pop out one of these frozen pesto cubes and--wala!--my evening meal is elevated to summery deliciousness.  This pesto is also great for making your own Seussian "green eggs" (ham optional). 

Usually, when It comes to making pesto, I just use what I have on hand in terms of nuts (almost always sunflower seeds) and cheese.  Lately, I have been l loving swapping out the traditional Parmesan cheese for nutritional yeast in my recipe.  This yeast is actually deactivated yeast that has a cheesy, nutty flavor and is often used as a cheese substitute in vegan dishes.  It can be found in most health food stores.   It is delicious, low in calories, and so good for you because it is high in fiber, protein, and vitamin B-12.  I also don't often put salt in my pesto, especially if I am going to freeze it because I want to make sure I don't over salt my dish if I am using pesto with other salty ingredients like prosciutto or mozzarella.  So I refrain from adding salt until I know what I'm pairing it with.  Let's just say I learned to tread lightly with the seasoning of my pesto after one too many salty dishes!

Ingredients:

2 cups packed organic basil

1 clove garlic

1/4 cup sunflower seeds

2/3 cup extra-virgin olive oil

1/2 cup nutritional yeast

Salt to taste (optional)

Add first three ingredients in a food processor until roughly chopped and blended.   Then add oil and mix until combined.  Finally, add in nutritional yeast (and salt if using) and combine.  Transfer to bowl or mason jar.  Store in fridge for 2-3 days or up to three months in freezer using ice cube trays.  Enjoy!

Enchantment Learning & Living is an inspirational blog celebrating life’s simple pleasures, everyday mysticism, and delectable recipes that are guaranteed to stir the kitchen witch in you. If you enjoyed what you just read and believe that true magic is in the everyday, subscribe to my newsletter below for regular doses of enchantment. Want even more inspiration? Follow me on Instagram, Facebook, Pinterest, and Twitter. Here’s to a magical life!

Comment
Share